Showing posts with label block. Show all posts

Friday, January 9, 2015

Aero Block-off Plates for the DC5 Part 3

To read about my previous attempts to smooth out the front of the DC5, check out these links:

Part 1
Part 2

The following article documents the removal of the front fog lights and fake brake ducts on the USDM Type-S for replacement with solid flat plates which are lighter than the fog lights and are more aerodynamic than the fake brake ducts.

When I'm autocrossing I don't experience brake fade anymore.  I used to with Advance Auto brake pads and stock rubber brake lines with DOT 3 brake fluid.  However, not that I've switched to DOT 4 fluid with stainless lines and Hawk brake pads I am not experiencing this phenomenon anymore.

When I do hard, high-speed street driving I also don't experience brake fade.  However, just in case I did I took the stock Type-S brake ducts and I cut out the fake grilles on the ducts.


To do so, I removed the fake grilles which simply clip into the bumper, and then I glued corrugated plastic onto the front of the fake duct.


After I did this, I had a fully removable block-off plate for the front bumper.  However, I wanted the plate to be flush with the bumper because this is better for aerodynamics.  Although for the driving I do this will yield negligible results I did it because it was a free mod.

So, with that being said, I primed them and decided to paint them with some cheap WalMart paint to make them match my bumper.


And although they look wonderful in the picture above, they actually didn't match the color of the paint on my bumper, so to make them look better, I decided I'd paint them an OEM satin black:


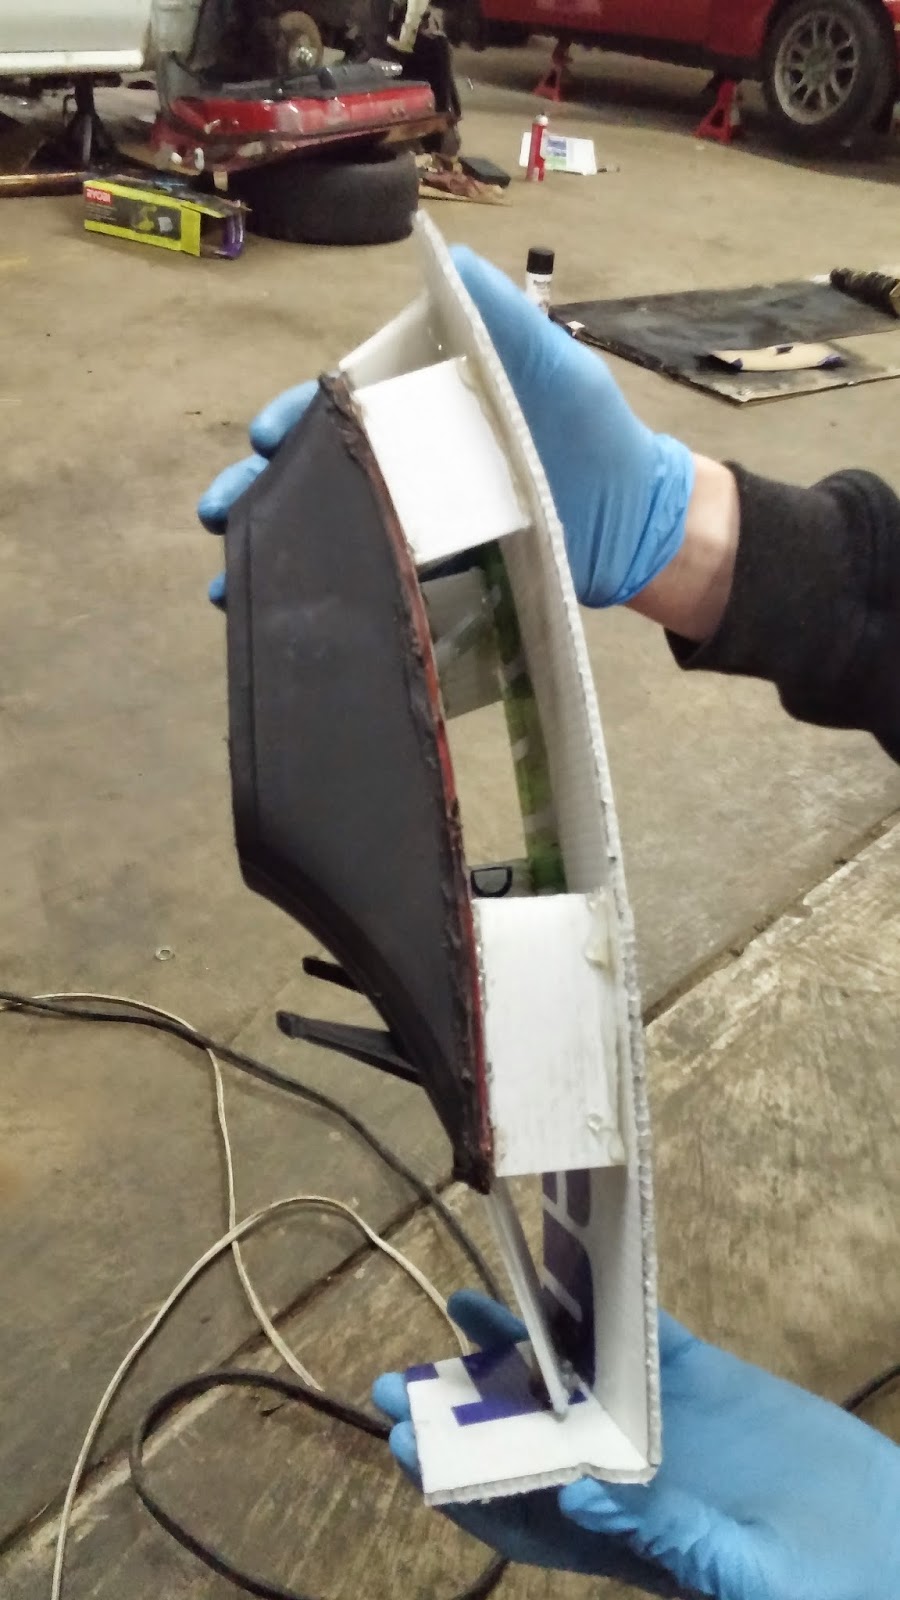
However, again, they weren't flush with the bumper.  So, I decided to make them flush with the bumper this time.  I'd sand the flat black plates that I showed you guys in the above pictures and I'd hot glue some extensions to them so that the new plate could sit flush with the front of the bumper.


With these "mounts" cooled off and solidly mounted to the original plate I made, I then cut out a template that would fit in front of the bumper and glues that onto these mounts.  Believe me, I am dumbing it down for you guys.


I painted these flat black, and then I inserted them into the bumper.  The goal was to have these pieces be fully removable and OEM-like in form and function.  The following pictures show the initial fit and finish:


After I finished this, I brought the parts of the plates that sat closest to the grille in the middle futher in toward the bumper.


The result was a modification that could hold up to even the most extreme of weather conditions.  Oh the joys of corrugated plastic!


That's it for this read.  Until next time, thanks for reading!


Sunday, February 23, 2014

Aero Block-off Plates for the DC5

Tactical Art EG6 with Aero Block-Off Plates-- Photo from The Chronicles

Aero Block-Off Plates for Project DC5

Hello all.

Welcome to another addition to the site.  In today's article I will be going over a new project for the DC5 which will be relatively low cost and partially for my own enjoyment and boredom.

Living in the country is no simple task for the semi-urban Philly Area boy that I am.  There is a lot of corn, there is plenty of beer and good fried food, a bunch of friendly people, some motor heads here and there who thoroughly enjoy the American muscle car, yet the atmosphere is much more relaxed than where I'm from.

And well, aside from coffee, the one thing that can help me speed things up a bit is cars.  However, cars cost money, money is a necessity, and necessities are...well, necessary.  So of course, there are always low cost projects and modifications that I'm looking for when it comes to my DC5.

Photo courtesy of Tahrek Nassab of Secret Society

It just so happens that racing encourages that type of attitude.  It is a sport in which slight modifications are encouraged to make the most out of your car while still staying in the same class.  

Yes, whether you're in auto-x, road racing, NASCAR, Formula 1, or on the Bonneville Flats, small changes can make big differences.  And that's what brings me to my next project-- fabricating aero block-off plates for the Lexi.Laron DC5.

Aerodynamics are extremely important for racing.  The faster you go, the more important aerodynamics become.  Things such as drag, down-force, and lift factor into how well your car can perform at the track.  And there are many modifications which one can do to change the way their car behaves aerodynamically.  

Take a look at the big wing on the back of the Loi-Spec ITR.  A wing can be used for added stability and extra down-force.

Photo courtesy of Honda Tuning

Since I am not the most knowledgeable person when it comes to aerodynamics I will use the help of some members from one of my favorite sites, K20A.org.  Therefore, I would like to thank BlackNDecker for his help before going any further with this article.

In a road racing thread on the forum meant for sharing track pictures, BlackNDecker and I began talking about the benefits of aero block-off plates.  In his response, he stated that these plates are used to prevent excess air from entering the engine bay which would increase drag, therefore slowing the car down, and would also increase frontal lift, decreasing front-end traction at high speeds.

A closer look at the Loi-Spec Aero Block-Off Plates-- Photo Courtesy of Project Onethirty

Another solution to this problem would be to route the air from the front of the car to a part of the car that needed the air for cooling.  This concept would apply to brake ducts which use frontal air to cool the brake rotors so that brake fade will  be reduced.  In my opinion this is a better option than the block-off plates, but I like my fog lights and so I would like to avoid removing them for brake ducts.

Brake ducts on a Miata-- Photo Courtesy of MiataTurbo.net

Another added benefit for me would be that these block-off plates will prevent rocks from kicking up and cracking my fog light lenses.  This is extremely useful for people who buy OEM fog lights or things like the JDM ion fog lights which cost around $300 on the forums.

So, why wouldn't I do this?  It's a relatively cheap project, it serves a purpose for function, and it will protect my fog lights.

With all of that being said, let's get to business.  I began with some poster board and started cutting away at it to try and get the right fitment on the front of my DC5.  Here's what the poster board looked like after a little while in the freezing cold with some scissors, some tape, a marker, and lots of clothing:


You'll notice that after I created this rendition I marked parts that needed to be changed for the next rendition.  After doing that I got some cardboard out and cut out the second rendition.  K is for Kelloggs (and K-Series)!

Then after some cutting, I test-fitted the second one on the car and made a third rendition to account for errors made on the second one.  I traced the THIRD one on a Cheerios box!


Then I added a little meat around the edges to ensure I'd have enough mounting space to get this to fit onto the bumper.


I was going to add these little round nubs to the edges of the block-off plate, but I decided that they wouldn't look good, so I just added an extra quarter inch or so to the edges.


After cutting out the third rendition I went out to the garage and test-fitted it on my bumper with some masking tape.


Then I bent in the inner part of the block-off plate and cut and trimmed the edges to make it fit well on the inner part of the grill.


When I continue this article I'm going to have the shapes cut out of acrylic and bent to fit on the front of the bumper.


Until then, any feedback is welcome.  I'll be updating the blog post to links with discussion about this on other forums.  Thanks guys!

Peace!


Thursday, January 9, 2014

Project DC5: Engine Builds for Dummies! Part 1


Engine Builds for Dummies!  Part 1

So after coming home from my amazing home I had enough of "dreaming" and I wanted to get down to "doing."

...

If you're anything like me, you know what it's like to be told that you can't do something.  Crap, we all know what that's like...and it feels like crap.

You can't have that nice car-- it's too expensive.  You can't modify said nice car, it's not practical.  If you get a motor how will you pick it up?  How will you take it apart?  Are you just going to sit in a freezing cold garage with a bunch of coats on and a breaker bar loosening 12-point head bolts from a hunk of metal?

Precisely..I will do precisely all of those things.


Well folks, the truth is if you have the determination to do something, whether it be small or large, then you can do it.  And although this article shows the partial disassembly and inspection of a motor-- something that people do every day that really is nothing special in itself, it also shows the beginning of a journey for me.  This is yet another step on the way to show those people who said I couldn't do it that I can.


And even if I don't end up finishing this build, or if I end up scrapping it, it's okay...because I learned.  And with that I'd like to begin listing some goals for this build:

1.) To learn-- this is my first motor "build."
2.) To build a reliable motor capable of around 250 whp or more.
3.) To save money without seriously cutting corners
4.) Again, to learn because this is my first motor "build."

If you, the reader, have anything to contribute so that I may learn more, then I encourage you to come forth...even if you're proving me wrong-- I'd rather be right in the end with the help of you!

Starting with my piece of ish engine stand and my beautifully mummified, incomplete long block I began the assembly of my stand first.


Voila..


With the engine chilling on the stand I held the crank still on the pulley end and I used a 1/2" ratchet with a cheater bar to remove the flex plate bolts on the transmission side.  Note this engine was pulled from an automatic CRV.


Here's the ratchet with the cheater bar on the transmission side that I used to remove the flex plate bolts:


As you can see, the flex plate bolts are to be removed by a 12-point socket.  This one is a 17 mm:


After loosening the bolts in a star pattern, remove them by hand so that you can take the flex plate off.


Here is what the washer for the flex plate looks like with all of the bolts sitting snug:


Here's the rusty flex plate:


A clean rear main:


Next I removed the crank pulley.  I didn't have the special Honda tool needed for this and I don't have a torque wrench here in Wisconsin, so when I got here I actually stopped.  However, because I'm so nice I'll keep going :)


As I mentioned before, this is partially a budget build.  Where I can save I will save.  Since I couldn't save by buying a brand new torque wrench, I began looking for the Honda Crank Pulley Removal Tool.  After searching the internet and scrounging the forums I finally found the golden grail!


Yes, freaking O'Reilly Auto Parts has this crazy Japanese weirdo tool for rental!  Anyway, here's the final lineup of tools I used to remove this stupid circle:


I paid about 30 bucks for all of these tools excluding the rented Honda tool.


And here's the cheater bar and the breaker bar that I used IN CONJUNCTION to break this sucker free.


Size of pipe:


And of course...we can't forget the magic "Liquid Wrench."


Using my new found supplies I took the ratchet and attached it to the Honda Crank Tool, and then I put the cheater bar on the end of my ratchet.  I placed the crank tool in the crank pulley, then I set the socket to the right motion and let the end of the cheater bar sit against the ground to provide resistance.


Then I took the breaker bar, and put a cheater bar on the breaker bar and I DID IT!  :D  One of the best feelings in the world is getting these hat crank pulleys off if you know anything about them.  I HATE THEM >:0


:)


If you're storing your parts in a bin and you're afraid of losing things, then pay attention here.  This block that I have circled inside of the crank pulley is called a woodruff key.  It mates with a notch in the crankshaft so that the pulley may spin with the bottom end.  Check it out.


 Then I removed the timing chain cover.  In the following pics I show some of the holes that once held bolts for the timing chain cover...which was apparently held on by just a gasket and three bolts from the oil pan into the timing chain cover 0___o


Timing chain cover in the RAW.


And here's a sneak peak of what's to come ;)


Thanks for checking out the blog guys and gals!  I'm glad to have a following from yous and I really hope you enjoy this ishhhh

Until next time, PEACE