

Engine Builds for Dummies! Part 2
If you missed Part 1, check it out here.
Story Time
After sustaining a single injury from the accident I spoke of in the last post, life has been a nuisance. I hurt my finger, so I bought a splint for it. Before going to the gym I put a liquid bandage over my cut and headed out. I took off my splint, proceeded to get swoll, and went home to make dinner and go to bed.
Laying in my bed I could not help but notice an extremely itchy sensation coming from my finger and the area around the cut that I received. So I turned on the light and looked at my finger.
My finger was red and a bunch of little, red, bumps showed up all over the area on the back of my hand! What the heck!
My finger was red and a bunch of little, red, bumps showed up all over the area on the back of my hand! What the heck!
It turned out that while I was working out, the liquid bandage actually "ripped" and allowed the cut on my hand to slightly open up. I touched it a couple of times working out, thinking "eh, it'll be okay" but I did not think that the gym has a WARM, MOIST ENVIRONMENT conducive to nasty things...
like ringworm -___-
Needless to say, I am living my life with a bulky finger splint and gobs of Lotrimin Ultra and antibiotic cream. Be grateful folks..
Be grateful.
Anyways, let's cut to the chase and talk about cars, shall we?
________________________________________________________________________
Engine Time
When I last left off I had finished taking off the flex plate, crank pulley, and timing chain cover. It took a bit of time but using the Honda Crank Pulley Tool and some big pipes I made it happen. So here's where I begin today:

With the timing chain cover off it was time to remove the timing chain tensioners from both sides of the engine. Using an allen wrench and a small copper tube for a cheater bar, I began to pop off the bolt for the first tensioner on the exhaust side of the engine.


Then I took a ratcheting wrench and a socket and popped off the tensioner on the intake side of the engine-- the side with the VTC cam gear which changes cam angle based on oil pressure.


Cam phasing allows the engine to run more economically at low RPM's and to obtain more torque, while providing more power at high engine speeds. This combined with the two different cam profiles of the VTEC system is what makes many of today's engines so efficient.
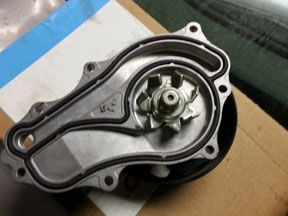
Here's the water pump that comes off of a K24A1. On the K20A2 motor for the RSX-S (02-04), the difference is that there is a small wall separating a second galley which allows for heat transfer between oil and the coolant that flows through the water pump. This basically means that the K20A2 has a oil to water heat exchanger. I'm just using fancy engineer talk :)
People often switch these water pumps for the K20A2 water pumps, however another water pump housing and other miscellaneous parts are needed for this conversion. The logic is that having an oil cooler is more beneficial for the engine-- so why not use an OEM one. However, my friends and I question that logic...considering water is hot...and so is the oil, so how efficient can these K20A2 water pumps be as heat exchangers?
I will most likely be running an external oil cooler if I get this engine back together and in my car.
The water pump on the left is K24A1 and the one on the right is for the K20A2.

So now let's go over how to take it off. There are six bolts holding it on. All you have to do is get an extension, a socket, and a ratchet.


Next I began to remove the water pump housing. Again, this is something that must be changed out to do the oil cooler water pump mod from the K20A2 motor. The reason is because the face of the housing mates to the face of the water pump and the galleys would be different. Check out the pic below:

To remove it, there are three bolts and one nut to remove. I already moved the top bolt and the top nut, so the following pics show the loosening of the bottom two bolts.


Before taking the whole housing off I cracked it slightly away from the block because it's sealed on there. It's a trick we use at my chemical plant to prevent excessive spills of fluids when opening flanges. I know the coolant would have spilled out with the pump already, but I'm more cautious than others I guess.


Here's the mating surface of the housing to the engine. It looks like oil flows on one side of this housing as well and is separated from the coolant. I imagine some heat exchange occurs here. Maybe a mechanic could help me know for sure! Comments are welcome!!

Here's where the block mated up to the water pump housing:

For hot weather in PA and for the sake of retaining daily driveability, I will most likely be keeping AC. However if I'm looking for extra power and saved weight I may actually delete the AC. The thing is, I don't plan on deleting power steering. Even though it will save me weight and make me power, the plan for this car is to auto cross and eventually hit up the road course for some racing. Without power steering this would be very difficult...though AC may be able to go!
The reason I bring this up is because the next thing I did was remove the AC compressor bracket! This part is replaced when buying the Hybrid Racing power steering and AC removal kit.


And if anyone needs it for any reason...here are some pics of the AC compressor bracket...not sure why I took these.


Then I lined up my sweet Menards Bucket that I stole from my landlord and prepared to DROP THE PAN!!!!! HAZAAHH.
This was my first time doing this so I was excited and nervous to see what kind of damage and wear was existent on the bottom end. I was mainly concerned with the crankshaft and not the big ends of the con-rods considering I plan on using aftermarket i-beam rods. And considering I've never built an engine before, I'm going to assume I'd be replacing all of the bearings anyway. I will be using OEM color-coded Honda bearings.

Flipping the engine over on the stand...

With the block upside down I proceeded to remove all of the oil pan bolts.

Then with the engine upside down I proceeded to remove the bolts holding the oil pan to the girdle. Then I took a dead blow hammer and knocked the pan off of the bottom end.

And checking the oil pan, there were no metal shavings! So far it's looking good :)

Anyway, I'm going to have to end it there and let you guess what comes next. Stay tuned for the next installment of "Project DC5: Engine Builds for Dummies! Part 3."
Until then thanks for tuning in :)

No comments:
Post a Comment
Comment