Hello Lexi.Laron readers! Welcome to another edition of your favorite blog, Lexi.Laron.
On May 13th I took part in my second Track Night in America with the SCCA. We ran New Jersey Motorsports Park's Thunderbolt configuration yet again. However, this time, I brought all of my friends after they all read about my first experience on my blog.
What does this mean? It means mushy, soft brakes.
On May 13th I took part in my second Track Night in America with the SCCA. We ran New Jersey Motorsports Park's Thunderbolt configuration yet again. However, this time, I brought all of my friends after they all read about my first experience on my blog.
After the track, we all headed to Red Robin in Deptford, New Jersey and grabbed a bite to eat. It was great settling down with friends and talking about all of the cars we raced against that day. Picture: The Fast and the Furious family dinner.
After a track day, there are usually a couple of things that you do to make sure your car is in working order.
Firstly, your brake fluid gets really hot. And like most liquids, brake fluid has a boiling point.
This is why race cars and properly track-prepped cars run DOT 4 fluid and up. DOT 4 is a good compromise between water solubility and compressibility when compared to DOT 5 and the conventional DOT 3.
Since your brakes get really hot, your fluid gets really hot, and that changes some of its properties. The most important property to take into account is how hygroscopic, or "water-loving," your brake fluid is. The hotter your brake fluid gets, the more soluble water becomes in it, thus decreasing its effective boiling point and its compressibility as well.
What does this mean? It means mushy, soft brakes.
Secondly, you're supposed to change your oil. Here's what my oil looked like after two track days and 2,000 miles of driving:
Needless to say, it was pretty black.
And in addition to all of that, I had a number of other things to take care of-- including a new clutch master cylinder, clutch slave cylinder, tie rods, and camber bolts. Expect some sweet DIY's soon!
The new tie rods and camber bolts are being installed because I have been riding with an insane amount of toe in and negative 0.7 degrees of camber on one side of my car and negative 1.7 degrees of camber on the other side of my car!
This is due to a couple of reasons. For one, the DC5's struts were designed so that the tie rod connects to them instead of to the upright, like on most cars. You can see it in the picture below:
As a result, when aftermarket manufacturers go to make coilovers for these cars, sometimes the placement is not perfect. Throw in a lower ride height, and the fact that there is play in between where the coilover connects to the upright, and you get finicky camber adjustments on a bulky, FWD car.
Another side effect is the fact that the stock tie rods will not have enough thread or they may be too short to accommodate the car's drop and the desired toe value.
Luckily for us DC5 owners, there are yet MORE aftermarket options to correct these pesky problems. See exhibit A below for further reference:
Exhibit A
The first piece of the puzzle are these Da Vinci Designs (DVRace.com) Tie Rods made by Todd from ClubRSX. These tie rods are "adjustable" but not in the way that most people are used to tie rods.
These tie rods actually are modified OEM units. The threaded part of the OEM tie rod is cut off, and a bolt is welded onto the end of the tie rod. Then, a long, threaded, metal dowel is inserted into the bolt.
You see, with this setup, even if you thread the tie rod end ALL the way onto the dowell with this setup, you can still spin the dowel itself into the tie rod, allowing you even MORE adjustment than simply cutting more threads into your tie rod as shown below:
In addition, if you take notice of the picture shown above, you will also notice that cutting threads further into an OEM tie rod may actually be dangerous. When you cut threads this deep, you are actually cutting into a part of the tie rod that is thinner, and although your tie rod may not fail in reality-- this is always one surefire way to increase the likelihood that it will fail...
The next piece of the puzzle is a set of camber bolts which go through where the coilover meets the upright in the front of the car.
Here's how camber bolts work:
Image from H&R
The bolt has an eccentric "lobe" much like a camshaft has lobes that control the valve motion in your cylinder head. As you turn the bolt while it is holding the strut to the upright, the lobe controls the angle at which the upright sits-- thus changing camber angle.
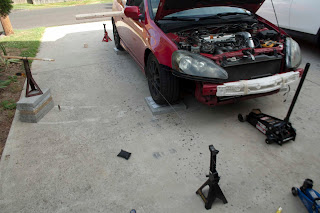
After installing all of my parts, I broke out the jack stands and did a string alignment.
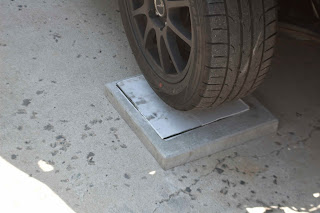
For starters, you're going to want a level surface. Based on previous experience, I know that if I want to achieve a level surface on my driveway, all I have to do is take four 16" by 16" concrete blocks, one for each wheel. Then, I put one tile on each of the concrete blocks for the rear wheels.
To create a "frictionless surface" otherwise known as "toe plates" I take two lineoleum tiles and place them face to face with some grease in between them. Then I lay the two plates under each wheel.
Since my rear alignment was done by Lykon Automotive in Levittown, PA (THANKS TYLER), I didn't have to touch it. The rear alignment is set at zero degrees of toe and negative two degrees of camber.
Therefore, I moved to the front, where I would set my specs to zero degrees of toe, and negative three degrees of camber. To start out, I simulated the weight of me in the passenger seat with some cement and gravel bags and I locked the wheel in place using zip ties and a piece of wood.
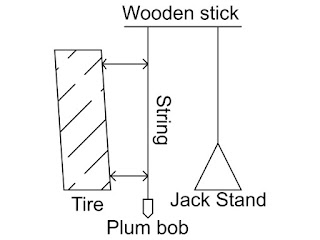
Then, I set up a vertical reference next to my wheels. Doing this allows me to measure my camber with a tape measure and some good old math and trigonometry. To make my vertical reference, I used my good friend gravity! Yes, I'm a nerd...but I'm a cool nerd with a racecar.
Here's a diagram of the setup:
If you measure the distance from the top of the wheel to the string and the distance from the bottom of the wheel to the string you can start to form a right triangle, where the diameter of the wheel is the hypotenuse.
Notice that the difference between the top string and the bottom string is the length of the top part of the right triangle.
The hypotenuse is 16", and you can find the difference between the top and bottom by using the tape measure, so all you have to do is use an inverse sine function to find the value of your camber angle:
This may seem complex, but any regular scientific calculator can perform this function
After my first measurement, I discovered that my camber was at negative 3.8 degrees.
So, I had to adjust my camber bolts to get the desired camber angle. To make adjustment easier, I removed my windshield washer fluid reservoir and got a 17 mm socket on a 1/2" wratchet and started turning the eccentric bolt.
After I got the desired camber on both sides of the vehicle using the aforementioned method, I took the wheels off and while holding the eccentric bolt in place, I tightened the nut holding on the eccentric bolt as tightly as I could by hand.
After setting camber on an alignment rack, you are normally supposed to set the toe. So, following convention I decided to do so. For toe, there is a commonly employed method by many grassroots racers known as a "string alignment."
You take two jack stands and some string, and you align the string to the "geometric center" of the car...much like an alignment rack can do for you automatically.
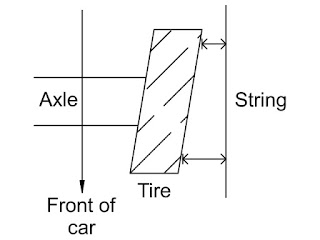
For a car with equal track widths front to rear (like my car) this is easily done by measuring from the center cap on your wheels to the string which spans the length of the car.
Once the distances from both center caps are equal on the front and rear of one side, move to the other side of the car and repeat the process.
To check toe, all you have to do is take two measurements on each front wheel-- one measurement at the front of the wheel and one at the rear.
Then you take note of the measurements. It's simple. If the front of your wheel is further from the string than the rear is, you have toe in on one side of your car.
If the distance between the front of your wheel is closer to the string than the rear is, you have toe out on one side of the car.
After you figure out what your toe setting is, you can spin the tie rods the way you need to spin them to get the desired toe. This was a snap with the Da Vinci Tie Rods from Todd. Thanks Todd!
After I finished my alignment, I set everything down and took the car for a drive.
Here are the final results for my alignment:
Front
- Camber: -2.9 degrees
- Toe: 0 degrees
Rear
- Camber: -2.0 degrees
- Toe: 0 degrees
With how much the car rotated on my previous track days, I can only imagine how much more the car will rotate for my next event. Couple that with the new tires I bought...and well...we'll just have to see how I do ;)
Thanks for reading guys. I hope you found this post as useful as my other ones!
Peace!


No comments:
Post a Comment
Comment