Thursday, January 31, 2013

Project DC5: #TorqueDamperProblems


So after weeks of working my butt off, I decided that I wanted to do a little upgrade to Arcie, my baby.  The goal for the car is to be clean, functional, pretty, quick, and purposefully modified.  In other words, I'm not going to slam my car or camber it to hell and if my car can't handle more power, I'm not going to put it on!  My goal was to get more power, not by adding it, but by utilizing already existent power...

How does one do that?

By stiffening things up of course!


So, I wanted to stop my engine from wasting torque by moving in the engine bay, and transferring some of that torque to the ground.  I could have installed mounts, but for the sake of adjustability and ease I went with this Ingalls Stiffy Torque Damper.

After I started installing it, everything was going great until I started rushing and this happened.


I over-torqued the stud on my strut tower -___-

Although my torque damper was firmly held in place by one other stud, and the broken stud still had some meat on it, I wouldn't just let it sit there, and I researched ways to begin fixing it.


I found out that I would have to remove my shock from the tower, unbolt it from the MacPherson Control Arm, and move it out of the way to punch out a press-fit stud!  All of that work to fix a stupid mistake??


So after calling my buddy Eric up to help me weld in a new stud, I began moving the necessary components out of the way to get this bad girl fixed up!  :)

The old stud was pretty stirdily press-fitted into that shock tower!  But with the help of a drill, me and Eric were able to bang it out.

...And Viola!  Check out that pesky torque damper that caused me all of this trouble.  >:(  (it wasn't my fault!!!  JK I suck.)

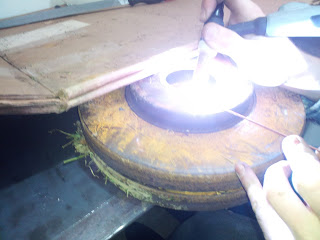
Then we headed out to the hardware store and picked up a simple bolt and washer to use as our stud.  We took a welding table, two brake rotors, and we were able to get ourselves a good enough ground to tig weld a couple of tacks from the bolt onto the washer.


This kid really is a good welder, and he's done some pretty cool stuff.  I've seen his beads on my buddy's cracked BMW Rim and they look grade A.


Then we disconnected the negative terminal of the battery, grounded the welder to the new stud after putting on the top bolt to hold it in place, and Eric got in some pretty tricky positions to get the job done.


Little aerial view for you helicopter-heads.  CHYEAH.


With the stud finally welded to the underside of the shock tower i resprayed it with some enamel, and let it dry.  Check out the heat-affected area on top.


There you go!  A brand new stud, welded in all nice.


Stay tuned for more of Project DC5 on Lexi.Laron!


Tuesday, January 29, 2013

Philadelphia Auto Show Coverage: Part 2


OK!  It's time for another addition of my Philly Auto Show Coverage!  Above you will see a bi-xenon projector from a 2013 Mini Cooper S.  I'm thinking this would be a good addition to Project DC5, and I'll be keeping you guys updated on that in the coming week.  ;)

Anyway, last week I took a trip to the Auto Show as you guys know, and I copped some pictures upstairs, in the luxury sections, and in the DUB Show Section.  The DUB Section is a compilation of tuner cars and marketing centered around the younger generations of drivers.  It's amazing to see how far it's come since I was a kid.

I mean it was only a couple of years ago that I was looking at a pimped out Escalade on "22s.  Now there's everything from modified motorcycles, to crazy sound systems, vendor booths selling HID's and other car parts, and tuner cars.  The Philly Auto Show has truly stepped up their game in the past couple of years.


From a night rave-like showroom floor, Philly has changed the theme to red carpets and smooth rides.  Modified Mustangs and Murcielagos adorned the showroom floor with the addition of a few banging other cars as well.


One controversial build at the DUB Show was this Volkswagen sitting on some mesh BBS's.  Rumor is that it was built in quite a short amount of time from the frame up!  It's funny that people still have time to bitch about dark tints even after all of that owner dedication.  Haters!!  Hahah, don't kill me...


But hate aside and controversy aside, it was a good touch to my experience.  The beautiful wheels and shiny paint...the rowdy engines and rare rides...the loud music and poster girls...and more will definitely linger in my mind this year.  Let's hope next year's DUB Show is this good!


And while you're hoping, don't forget to hop on over to the Facebook Page to see more photos NOT posted to the blog from the auto show and other adventures in the life of Lexi.Laron Author, Dillon.

Thanks for reading, as always, and have a great-ass and car-filled day!!!  >:D


Sunday, January 27, 2013

Philadelphia Auto Show: Classics, Exotica, and More


So I went to the Philly Auto Show last week and decided that it was finally time to throw some photos up with the close of the show this Sunday!  I'm gonna go easy on you guys with the words and I'll just focus on the pictures.  ;)

See you guys when I post up the rest of them!

Check out this oldie limo!


American muscle.


Philly Fiat??


Let the good times roll with this turbocharged beast.


Mean as hell.  I loved how simplistic the Mazda 3 remained, even in this age of technology and crash test technology.


And for the closer, here's this Lamborghini Gallardo.


Peace...


Tuesday, January 22, 2013

Project DC5: Installing the Civic CMC

So if you or one of your friends or one of your friends' friends are friends with friendly, old me on Facebook, chances are you've been barraged by an ishton of statii about me installing a 2001 Civic Clutch Master Cylinder into my 2006 RSX Type-S.  Chances are you were confused as to what a CMC is, and chances are if you're reading this you finally know!  (CLUTCH MASTER CYLINDER)

The reason we RSX Type-S people install these is because they are less prone to failure and because they are a direct replacement for the stock RSX Clutch Master Cylinder.  I'll get more into that later with a side-by-side comparison.  I'll even talk about the difference or lack of a difference between the two.  YOU'LL HAVE TO READ TO THE END TO FIND OUT LULZ.

Annoyed yet?

On a cold winter night I fired up the salamander after trying NUMEROUS empty propane tanks which are shown in the picture.  It was cold as ever, but I'm dedicated.

Then I popped the hood, took a look at the baby in her crib, and went inside of the cabin to start disecting my clutch pedal.  I removed a couple of bolts, pulled a rod, and presto-- the clutch master cylinder's rod was disconnected from my clutch pedal.  So easy.


Per read recommendation by a ClubRSX member by the name of SPAZ, I jacked the car up and removed the wheel for easier access to the clutch master cylinder.  This is because the clutch master cylinder is located just below the brake master cylinder and a little to the left.  Take a look at my slotted rotors!  Nothing fancy, but they're pretty sweet!  I plan on repainting those ugly calipers again -____- red fades.


After removing the bolts on the interior, I jiggled and wiggled the thing below my brake master cylinder in that picture right there.  That's the clutch master cylinder that I'm changing.


Here's a picture of the CMC being pulled all the way out through the wheel well.  Spaz-approved technique!


I clamped the reservoir hose with a small c-clamp to prevent brake fluid from going all over my...well everywhere.


And eventually I got through it all and pulled it out.  The RSX one is on the left while the Civic one is on the right.  Notice the lack of a little cast-in manifold and block-off plate on the Civic one.  People say that this rotary-shaped block-off plate is the culprit for early failure in the RSX CMC.

I think that this was put in as a hydraulic fluid damper to make clutch stroke softer because Acura is a luxury car and Honda is not a luxury car.  Note that the piston-cylinder combination on both units is of the same size, but again, the only thing lacking is that little manifold thing and its block-off plate.  According to typical thermodynamics, decreasing the volume of a chamber at steady-state while maintaining a constant pressure results in more energy.

Basically, that Civic CMC gives me a better clutch disengagement because it has more energy.  No more misshifts for I!


After driving the car around for a while, to and from my job which is 60 miles away from home, I can honestly say that this is one of the greatest upgrades for an RSX.  It's an authentic Nissin CMC, and I only paid $70 after shipping!  What a deal!

Stay tuned for the next installment of Project DC5 when I showcase my Ingalls Torque Damper install and how I fixed the stud that I over-torqued with a little bit of heat and tungsten.  ;)

Until then, Lexi.Laron...signing out.