Showing posts with label type-s. Show all posts

Tuesday, June 2, 2015

Race Day Prep: DIY Alignment and Post-Track Day Maintenance

Hello Lexi.Laron readers!  Welcome to another edition of your favorite blog, Lexi.Laron.

On May 13th I took part in my second Track Night in America with the SCCA.  We ran New Jersey Motorsports Park's Thunderbolt configuration yet again.  However, this time, I brought all of my friends after they all read about my first experience on my blog.


After the track, we all headed to Red Robin in Deptford, New Jersey and grabbed a bite to eat.  It was great settling down with friends and talking about all of the cars we raced against that day.  Picture: The Fast and the Furious family dinner.


After a track day, there are usually a couple of things that you do to make sure your car is in working order.  

Firstly, your brake fluid gets really hot.  And like most liquids, brake fluid has a boiling point.

This is why race cars and properly track-prepped cars run DOT 4 fluid and up.  DOT 4 is a good compromise between water solubility and compressibility when compared to DOT 5 and the conventional DOT 3.


Since your brakes get really hot, your fluid gets really hot, and that changes some of its properties.  The most important property to take into account is how hygroscopic, or "water-loving," your brake fluid is.  The hotter your brake fluid gets, the more soluble water becomes in it, thus decreasing its effective boiling point and its compressibility as well.

What does this mean?  It means mushy, soft brakes.

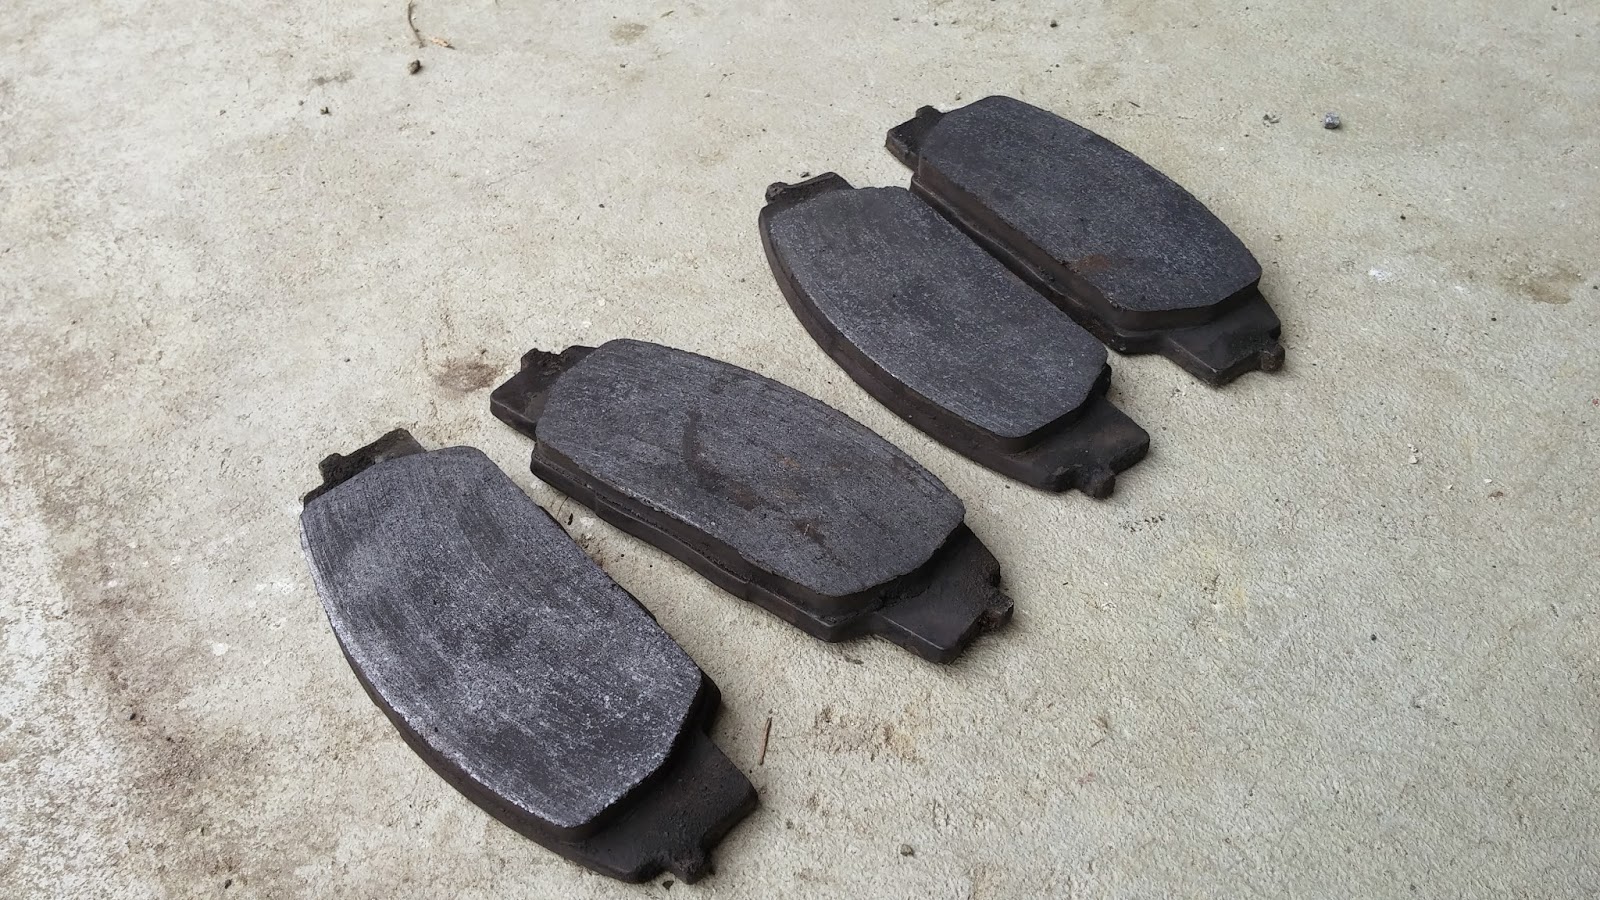
Secondly, you're supposed to change your oil.  Here's what my oil looked like after two track days and 2,000 miles of driving:


Needless to say, it was pretty black.

And in addition to all of that, I had a number of other things to take care of-- including a new clutch master cylinder, clutch slave cylinder, tie rods, and camber bolts.  Expect some sweet DIY's soon!


The new tie rods and camber bolts are being installed because I have been riding with an insane amount of toe in and negative 0.7 degrees of camber on one side of my car and negative 1.7 degrees of camber on the other side of my car!


This is due to a couple of reasons.  For one, the DC5's struts were designed so that the tie rod connects to them instead of to the upright, like on most cars.  You can see it in the picture below:


As a result, when aftermarket manufacturers go to make coilovers for these cars, sometimes the placement is not perfect.  Throw in a lower ride height, and the fact that there is play in between where the coilover connects to the upright, and you get finicky camber adjustments on a bulky, FWD car.

Another side effect is the fact that the stock tie rods will not have enough thread or they may be too short to accommodate the car's drop and the desired toe value.

Luckily for us DC5 owners, there are yet MORE aftermarket options to correct these pesky problems.  See exhibit A below for further reference:

Exhibit A

The first piece of the puzzle are these Da Vinci Designs (DVRace.com) Tie Rods made by Todd from ClubRSX.  These tie rods are "adjustable" but not in the way that most people are used to tie rods.

These tie rods actually are modified OEM units.  The threaded part of the OEM tie rod is cut off, and a bolt is welded onto the end of the tie rod.  Then, a long, threaded, metal dowel is inserted into the bolt.


You see, with this setup, even if you thread the tie rod end ALL the way onto the dowell with this setup, you can still spin the dowel itself into the tie rod, allowing you even MORE adjustment than simply cutting more threads into your tie rod as shown below:


In addition, if you take notice of the picture shown above, you will also notice that cutting threads further into an OEM tie rod may actually be dangerous.  When you cut threads this deep, you are actually cutting into a part of the tie rod that is thinner, and although your tie rod may not fail in reality-- this is always one surefire way to increase the likelihood that it will fail...

The next piece of the puzzle is a set of camber bolts which go through where the coilover meets the upright in the front of the car.


Here's how camber bolts work:

Image from H&R

The bolt has an eccentric "lobe" much like a camshaft has lobes that control the valve motion in your cylinder head.  As you turn the bolt while it is holding the strut to the upright, the lobe controls the angle at which the upright sits-- thus changing camber angle.

After installing all of my parts, I broke out the jack stands and did a string alignment.


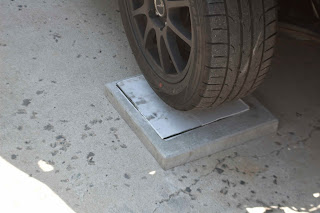
For starters, you're going to want a level surface.  Based on previous experience, I know that if I want to achieve a level surface on my driveway, all I have to do is take four 16" by 16" concrete blocks, one for each wheel.  Then, I put one tile on each of the concrete blocks for the rear wheels.


To create a "frictionless surface" otherwise known as "toe plates" I take two lineoleum tiles and place them face to face with some grease in between them.  Then I lay the two plates under each wheel.


Since my rear alignment was done by Lykon Automotive in Levittown, PA (THANKS TYLER), I didn't have to touch it.  The rear alignment is set at zero degrees of toe and negative two degrees of camber.

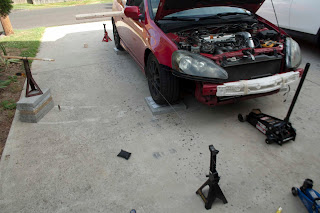
Therefore, I moved to the front, where I would set my specs to zero degrees of toe, and negative three degrees of camber.  To start out, I simulated the weight of me in the passenger seat with some cement and gravel bags and I locked the wheel in place using zip ties and a piece of wood.


Then, I set up a vertical reference next to my wheels.  Doing this allows me to measure my camber with a tape measure and some good old math and trigonometry.  To make my vertical reference, I used my good friend gravity!  Yes, I'm a nerd...but I'm a cool nerd with a racecar.


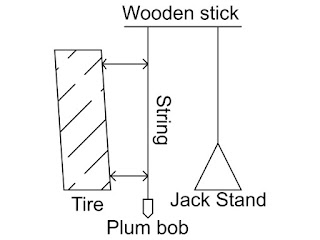
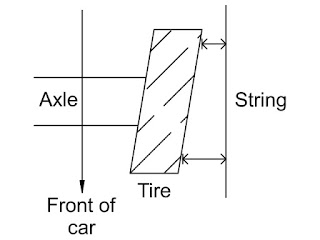
Here's a diagram of the setup:


If you measure the distance from the top of the wheel to the string and the distance from the bottom of the wheel to the string you can start to form a right triangle, where the diameter of the wheel is the hypotenuse.  

Notice that the difference between the top string and the bottom string is the length of the top part of the right triangle.


The hypotenuse is 16", and you can find the difference between the top and bottom by using the tape measure, so all you have to do is use an inverse sine function to find the value of your camber angle:


This may seem complex, but any regular scientific calculator can perform this function


After my first measurement, I discovered that my camber was at negative 3.8 degrees.


So, I had to adjust my camber bolts to get the desired camber angle.  To make adjustment easier, I removed my windshield washer fluid reservoir and got a 17 mm socket on a 1/2" wratchet and started turning the eccentric bolt.


After I got the desired camber on both sides of the vehicle using the aforementioned method, I took the wheels off and while holding the eccentric bolt in place, I tightened the nut holding on the eccentric bolt as tightly as I could by hand.


After setting camber on an alignment rack, you are normally supposed to set the toe.  So, following convention I decided to do so.  For toe, there is a commonly employed method by many grassroots racers known as a "string alignment."


You take two jack stands and some string, and you align the string to the "geometric center" of the car...much like an alignment rack can do for you automatically.


For a car with equal track widths front to rear (like my car) this is easily done by measuring from the center cap on your wheels to the string which spans the length of the car.


Once the distances from both center caps are equal on the front and rear of one side, move to the other side of the car and repeat the process.

To check toe, all you have to do is take two measurements on each front wheel-- one measurement at the front of the wheel and one at the rear.


Then you take note of the measurements.  It's simple.  If the front of your wheel is further from the string than the rear is, you have toe in on one side of your car.


If the distance between the front of your wheel is closer to the string than the rear is, you have toe out on one side of the car.

After you figure out what your toe setting is, you can spin the tie rods the way you need to spin them to get the desired toe.  This was a snap with the Da Vinci Tie Rods from Todd.  Thanks Todd!


After I finished my alignment, I set everything down and took the car for a drive.

Here are the final results for my alignment:

Front
  • Camber: -2.9 degrees
  • Toe: 0 degrees
Rear
  • Camber: -2.0 degrees
  • Toe: 0 degrees
With how much the car rotated on my previous track days, I can only imagine how much more the car will rotate for my next event.  Couple that with the new tires I bought...and well...we'll just have to see how I do ;)


Thanks for reading guys.  I hope you found this post as useful as my other ones!

Peace!


Monday, April 20, 2015

Philly SCCA Mini of the Mainline Event #1


Photo by Anthony DiGiovanni

Welcome back readers.  On Sunday, April 19th, Philly SCCA had their first event of the season for points-- Mini of the Mainline Event #1.

The week following this event was full of racing action.  I had a test and tune on the previous Sunday, I had a track day on Wednesday of that week, and those events all led up to the first autocross of the season.


With over 150 entries, the season opener is always full of people and there is a limited amount of runs.  This means that there were only four runs for each person and therefore less opportunities to tweak the car's settings.

My run occurred in heat three.  During heat two, I took the opportunity to prep my car for the first run.  In addition, my friends Edd and Shawn ran in heat two!

Edd's Car

At the test and tune, I noticed that I was getting a lot of sidewall scrub at what seemed like the optimal tire pressure for a compromise of grip and oversteer for my heavy, front-wheel drive car.  So, I decided to change my tire pressures from low to high.  Here is what the tire pressures were at before I ran:
  • Front Driver: 34 PSI
  • Front Pass.: 32 PSI
  • Rear Driver: 32 PSI
  • Rear Pass: 30 PSI
It looks like they had changed since my track day since my tire pressures were two PSI lower on my passenger side than my driver side.  Maybe I don't remember changing them after some hot laps?  NJMP's thunderbolt does have a lot of left turns after all.  The pressures for the first run were:
  • Front Driver: 40 PSI
  • Front Pass.: 40 PSI
  • Rear Driver: 36 PSI
  • Rear Pass.: 36 PSI
For the second run, I noticed a lot of understeer.  Despite this I went down to 36 PSI in the rear while the tires were hot.  Note that hot PSI are always higher than cold PSI.  Think ideal gas law if you've ever been in a high school chemistry class.  Run 2:
  • Front: 40 PSI
  • Rear: 36 PSI
Second run was my best run.  I understeered like crazy into a corner after the turnaround at Warminster, but the time I made up in the slalom on the first half of the course made a huge difference.  I don't know why I didn't just wait to see if my brakes would heat up to allow me to stop sooner or if the increased tire temps would increase my quickness, but I guess I was just antsy.

Photo by Anthony DiGiovanni

I think that's one of the challenges with autocross for a guy like me.  I'm so tempted to make changes to the car when it may not be necessary.  I may have just been able to leave the car at the same tire pressures since I did so well in the first half of the course and just adjust my driving style for the second half of the course.

Photo by Anthony DiGiovanni

I guess it all comes with experience.  Anyway, I adjusted my tire pressures for the third run despite all of this.  Run three was as follows:
  • Front: 38 PSI
  • Rear: Same as before
Photo by Anthony DiGiovanni

Run three was actually slower than I predicted.  I got some pretty nasty oversteer in the first slalom and that slid me into the Chicago box on the firs thalf of the course.  As a result I decided to lower the rear tire pressure for the fourth run:
  • Front: 36 PSI
  • Rear: 32 PSI
The fourth run went better in the first half of the course, but again my brakes didn't bite as I had expected in the second half of the course...so I ended up hitting a cone head-on with my car.  It kind of sucked!  At the end of the day my best time was a 42.9 and I got third in DSP thanks to my mishap on the fourth run!


Photo by Anthony DiGiovanni

Despite all of this nonsense though, as you can see in the above picture, my friend Alex finally got to autocross his winter build known as Touge Turbo!  Go look up the hash tag on Instagram to see more his build!  #TougeTurbo

The video of my runs is below!  I even included cockpit video with this one and as usual I included commentary on my driving technique and on the car setup.  Thanks for reading guys!


Friday, April 17, 2015

Track Day Bro!

Hey readers!


With racing season upon us I will have many opportunities to fill your plates with plentiful portions of technical jargon, racecars, and fun, fast, and safe driving!  On April 15th, I experienced my first track day ever thanks to SCCA and their new program called "Track Night in America."


Track Night in America is aimed at newcomers who wish to enter into track racing from essentially any avenue.  Whether you're a kart racer, autocrosser, or traffic jam bum, if you want to get to racing then you can do so with Track Night in America thanks to the SCCA.  It is a safe, controlled environment where you can push the limits of your car.  

As a matter of fact, everyone I was driving with either autocrossed before or was a regular autocrosser!

Image from SCCA

With a price tag of $150 before a one day only $25 discount, I could not resist the temptation.  Although the track day occurred from 3 to 9 PM, cutting into the work day, so-to-speak, this price is nearly half the cost of an average track day with HPDE or Hooked on Driving or any other camp.  However, with any event comes preparation that needs to take place.

As mentioned in my previous article, one of the first things I tackled was the brake pad situation.  On the track, stopping and turning are much more important than going straight.  One of the first things mentioned on New Jersey Motorsports Park's tech form is that brake pads should have more than one half of their life left.  


Since I had been using my HP Plus pads for more than a season of autocross, I felt it was time to finally replace them.  Here's what the old pads looked like-- they definitely have some life left in them!


Next, I sent my car off to my good friend Alex who was supposed to align my car.  The desired settings were:

Front camber: -3.0 degrees
Rear camber: -2.0 degrees
Front and rear toe: Neutral
Caster: non-adjustable on the RSX

However, thanks to a seized rear eccentric bolt, rear toe was not adjustable.  Since Alex didn't want to do a half-good job of aligning my car, he stopped at rear camber and let me know that after four hours he was unable to do anything with the car.  Thanks anyway Alex!


In addition to my poor alignment, out of good will, while Alex was washing my car, my aero block-off plates came off!  I guess it's better it happened there than at the track!


So, not only was my alignment bad and my block-off plates had popped off, but there was a slew of other things I had to comb over before I brought the car on the track.  On the checklist I had:
  • Fix front camber on driveway
  • Fix front toe on driveway
  • Make sure all bumper clips were securely fastened
  • Tighten down the battery strap
  • Install my new Hawks and bed them in
  • And make sure all suspension components were in good order.
I started by jacking the car up and maxing out the camber, within reason, on my adjustable top hats.  The top hats are pictured below:


However once I did that, the car's toe was EXTREMELY out of whack.  The car tracked hard to the right, so I had to adjust the tie-rod ends with some guesswork.

After doing that I tightened down the battery strap, I tightened the lower locking collars on my coilovers, I checked all of the wheel bearings, I installed my pads, and I bedded them in.  Since I had done so much in just a couple of hours before I was due to leave, I took it easy on my way to New Jersey Motorsports Park (NJMP).

When I got there, I signed in at the gate, drove to Thunderbolt (one of two circuits at NJMP) and got set up at the paddock area.


I brought a couple of things with me to make sure I'd be able to lounge comfortably during the advanced and intermediate sessions, my friend's GoPro, and I also brought some tools with me to make sure the car would be in good hands.

This is, of course, in addition to my helmet, which you must have, my long-sleeve sweater, which you must have, my close-toe shoes, which you must have, and my long pants, which you also must have.


Here's a more detailed list of what I brought:
  • A large tarp to cover my belongings
  • A box of open-ended wrenches
  • 10 mm through 14 mm deep sockets and a ratchet
  • A small toolkit which was comprised of a small ratchet and multiple shallow sockets
  • Allen wrenches
  • A chair
  • Dinner (PB&J)
  • Lots of water
  • GoPro
  • GoPro charger
  • Number plates-- in case we needed to be marked
  • Painters tape-- to hold my magnetic number plates to the car
  • A pen and some paper
  • Sunscreen
  • Helmet
  • Sweater
  • Jack stand
Note that I may have over-packed, but it was my first track day and I did not want to be unprepared.

Once set up, we held a driver's meeting.  During the driver's meeting we went over hand-signals to let people know that you want them to pass you, we went over passing zones, we went over flag signals, and we went over general tips to stay safe on the track.  The novice group had their own special leader who took the time to ensure we all had a fun, safe time on the track.  His name was Tom.  Thanks Tom!


After the driver's meeting, we filled out a self-tech form.  This form goes over everything from having your battery tied down, to discolored, cracked, or warped brake rotors, to no floor mats or loose items in the car.  We signed it to ensure that we were liable for any accidents and handed it over to the coordinators of the event.

Then, we headed out for paced laps to understand the corners on the track, including turn-in points, apex points, exit points, braking points, acceleration zones, and passing zones.  Here's the car that I was following-- an intermediate class STi!


After the paced laps, we sat and waited for the advanced driver (there was only one) to finish his run.  However, due to a stroke of bad luck, his drain plug came loose and he spilled some oil on the track.  According to my sources though, he was able to turn off the motor in time before damaging it!!  I'm happy to hear that.


As a result, there was a bunch of kitty litter put out on the track to make sure that no one slid on the oil.  This made for some tricky situations on its own, but it was definitely better than the greasy alternative, if you know what I mean.


After the mishap in the advanced group, we all waited for the intermediate group to get finished with their runs.  While we waited, I got some cool videos of the faster guys driving by!


And finally it was time for the beginner group to run.  Here's a map of Thunderbolt and the layout we ran for future reference:


Initially I took it slow.  I wanted to get a feel for the track and ramp up my corner speeds and get later and later in my braking zones to push the car.

Eventually I got comfortable on the track and really learned where I could push the car.  The turns that were covered in kitty litter initially tripped me up really bad.  And after the long front straight that leads into Turn 1 at NJMP, I learned that it was difficult to heel-toe due to the sheer magnitude of braking that needed to be done.

This area proved difficult to heel-toe downshift in


I wasn't passed once and after the first run everyone was asking who was driving the red Honda!

However, whenever you drive your car hard, it is to be expected that there may be some sort of mechanical issue.  When I popped the hood I noticed oil on one side of my valve cover and freaked out!  I quickly took off my intake manifold cover and while doing so I noticed that a bolt holding my valve cover on had come off.  The area is shown below:


So, I simply took a bolt from somewhere else in the engine bay and replaced the one that fell off with it.  Notice how there's no washer on the middle, front valve cover bolt as well.  That's because I took that washer and used it on the corner valve cover bolt.

After that, for the second run I took things easy at first.  I watched my temperature gauge and looked in my rear view for smoke.  I also kept my senses keen to make sure that no funny smells were coming from my engine bay.  With all things in check, I began to push the car a little harder and I still did not get passed once.

Finally, before I started the last lap, I asked the novice instructor, Tom, about one corner in particular that I did not know how to handle.  It was unlike some of the kinks that took place at high speeds because for those I could just let off the throttle, oversteer, and hit the gas.  It was also unlike the low-speed technical corners where I could slam the brakes, oversteer, and hit the gas.  

He ended up telling me to keep the car in forth gear, brake gradually, and let off gradually.  Doing so induced corner entry oversteer and allowed me to power out of the corner.  Here's the corner I'm talking about:


If you want to take a look at my driving, check out this video!  It has a lot of comments to help you guys see what I was thinking and what I was doing to be slower or faster through given sections and corners!  Maybe if you want to get into track racing this will help you!


At the end of the day I ended up meeting a bunch of people and having an amazing time.  Everyone agreed that I was the fastest of the day and I learned so much and had a blast driving with the other novices.  People kept asking if my car was turbocharged and how much displacement I had.  When one driver heard I had an N/A 2.0 liter motor he was shocked!

When I was leaving, some instructors even stopped by and asked who was driving the "red Honda" as everyone called it.  They said, yeah, "you're definitely ready for intermediate group!"

It felt so good finally being fast-- as compared to autocross where all of the lighter cars with better tires destroy me.  I guess we'll see how I do next time!  But for now, I'm gonna sign off.  Hope you had fun reading!