Showing posts with label K20Z1. Show all posts

Friday, April 17, 2015

Track Day Bro!

Hey readers!


With racing season upon us I will have many opportunities to fill your plates with plentiful portions of technical jargon, racecars, and fun, fast, and safe driving!  On April 15th, I experienced my first track day ever thanks to SCCA and their new program called "Track Night in America."


Track Night in America is aimed at newcomers who wish to enter into track racing from essentially any avenue.  Whether you're a kart racer, autocrosser, or traffic jam bum, if you want to get to racing then you can do so with Track Night in America thanks to the SCCA.  It is a safe, controlled environment where you can push the limits of your car.  

As a matter of fact, everyone I was driving with either autocrossed before or was a regular autocrosser!

Image from SCCA

With a price tag of $150 before a one day only $25 discount, I could not resist the temptation.  Although the track day occurred from 3 to 9 PM, cutting into the work day, so-to-speak, this price is nearly half the cost of an average track day with HPDE or Hooked on Driving or any other camp.  However, with any event comes preparation that needs to take place.

As mentioned in my previous article, one of the first things I tackled was the brake pad situation.  On the track, stopping and turning are much more important than going straight.  One of the first things mentioned on New Jersey Motorsports Park's tech form is that brake pads should have more than one half of their life left.  


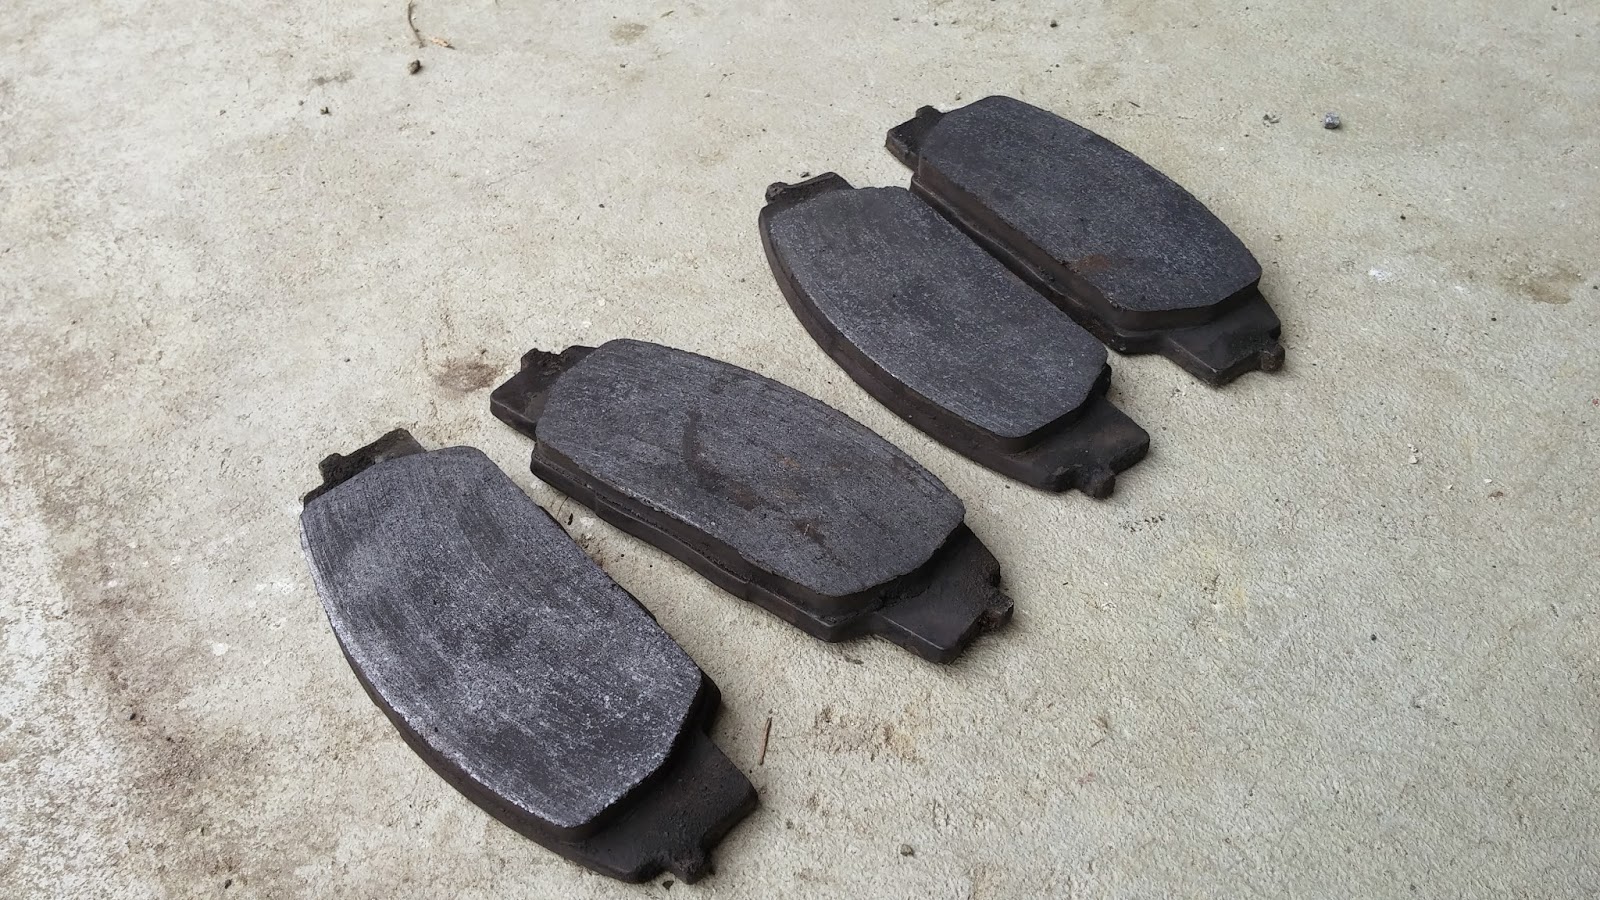
Since I had been using my HP Plus pads for more than a season of autocross, I felt it was time to finally replace them.  Here's what the old pads looked like-- they definitely have some life left in them!


Next, I sent my car off to my good friend Alex who was supposed to align my car.  The desired settings were:

Front camber: -3.0 degrees
Rear camber: -2.0 degrees
Front and rear toe: Neutral
Caster: non-adjustable on the RSX

However, thanks to a seized rear eccentric bolt, rear toe was not adjustable.  Since Alex didn't want to do a half-good job of aligning my car, he stopped at rear camber and let me know that after four hours he was unable to do anything with the car.  Thanks anyway Alex!


In addition to my poor alignment, out of good will, while Alex was washing my car, my aero block-off plates came off!  I guess it's better it happened there than at the track!


So, not only was my alignment bad and my block-off plates had popped off, but there was a slew of other things I had to comb over before I brought the car on the track.  On the checklist I had:
  • Fix front camber on driveway
  • Fix front toe on driveway
  • Make sure all bumper clips were securely fastened
  • Tighten down the battery strap
  • Install my new Hawks and bed them in
  • And make sure all suspension components were in good order.
I started by jacking the car up and maxing out the camber, within reason, on my adjustable top hats.  The top hats are pictured below:


However once I did that, the car's toe was EXTREMELY out of whack.  The car tracked hard to the right, so I had to adjust the tie-rod ends with some guesswork.

After doing that I tightened down the battery strap, I tightened the lower locking collars on my coilovers, I checked all of the wheel bearings, I installed my pads, and I bedded them in.  Since I had done so much in just a couple of hours before I was due to leave, I took it easy on my way to New Jersey Motorsports Park (NJMP).

When I got there, I signed in at the gate, drove to Thunderbolt (one of two circuits at NJMP) and got set up at the paddock area.


I brought a couple of things with me to make sure I'd be able to lounge comfortably during the advanced and intermediate sessions, my friend's GoPro, and I also brought some tools with me to make sure the car would be in good hands.

This is, of course, in addition to my helmet, which you must have, my long-sleeve sweater, which you must have, my close-toe shoes, which you must have, and my long pants, which you also must have.


Here's a more detailed list of what I brought:
  • A large tarp to cover my belongings
  • A box of open-ended wrenches
  • 10 mm through 14 mm deep sockets and a ratchet
  • A small toolkit which was comprised of a small ratchet and multiple shallow sockets
  • Allen wrenches
  • A chair
  • Dinner (PB&J)
  • Lots of water
  • GoPro
  • GoPro charger
  • Number plates-- in case we needed to be marked
  • Painters tape-- to hold my magnetic number plates to the car
  • A pen and some paper
  • Sunscreen
  • Helmet
  • Sweater
  • Jack stand
Note that I may have over-packed, but it was my first track day and I did not want to be unprepared.

Once set up, we held a driver's meeting.  During the driver's meeting we went over hand-signals to let people know that you want them to pass you, we went over passing zones, we went over flag signals, and we went over general tips to stay safe on the track.  The novice group had their own special leader who took the time to ensure we all had a fun, safe time on the track.  His name was Tom.  Thanks Tom!


After the driver's meeting, we filled out a self-tech form.  This form goes over everything from having your battery tied down, to discolored, cracked, or warped brake rotors, to no floor mats or loose items in the car.  We signed it to ensure that we were liable for any accidents and handed it over to the coordinators of the event.

Then, we headed out for paced laps to understand the corners on the track, including turn-in points, apex points, exit points, braking points, acceleration zones, and passing zones.  Here's the car that I was following-- an intermediate class STi!


After the paced laps, we sat and waited for the advanced driver (there was only one) to finish his run.  However, due to a stroke of bad luck, his drain plug came loose and he spilled some oil on the track.  According to my sources though, he was able to turn off the motor in time before damaging it!!  I'm happy to hear that.


As a result, there was a bunch of kitty litter put out on the track to make sure that no one slid on the oil.  This made for some tricky situations on its own, but it was definitely better than the greasy alternative, if you know what I mean.


After the mishap in the advanced group, we all waited for the intermediate group to get finished with their runs.  While we waited, I got some cool videos of the faster guys driving by!


And finally it was time for the beginner group to run.  Here's a map of Thunderbolt and the layout we ran for future reference:


Initially I took it slow.  I wanted to get a feel for the track and ramp up my corner speeds and get later and later in my braking zones to push the car.

Eventually I got comfortable on the track and really learned where I could push the car.  The turns that were covered in kitty litter initially tripped me up really bad.  And after the long front straight that leads into Turn 1 at NJMP, I learned that it was difficult to heel-toe due to the sheer magnitude of braking that needed to be done.

This area proved difficult to heel-toe downshift in


I wasn't passed once and after the first run everyone was asking who was driving the red Honda!

However, whenever you drive your car hard, it is to be expected that there may be some sort of mechanical issue.  When I popped the hood I noticed oil on one side of my valve cover and freaked out!  I quickly took off my intake manifold cover and while doing so I noticed that a bolt holding my valve cover on had come off.  The area is shown below:


So, I simply took a bolt from somewhere else in the engine bay and replaced the one that fell off with it.  Notice how there's no washer on the middle, front valve cover bolt as well.  That's because I took that washer and used it on the corner valve cover bolt.

After that, for the second run I took things easy at first.  I watched my temperature gauge and looked in my rear view for smoke.  I also kept my senses keen to make sure that no funny smells were coming from my engine bay.  With all things in check, I began to push the car a little harder and I still did not get passed once.

Finally, before I started the last lap, I asked the novice instructor, Tom, about one corner in particular that I did not know how to handle.  It was unlike some of the kinks that took place at high speeds because for those I could just let off the throttle, oversteer, and hit the gas.  It was also unlike the low-speed technical corners where I could slam the brakes, oversteer, and hit the gas.  

He ended up telling me to keep the car in forth gear, brake gradually, and let off gradually.  Doing so induced corner entry oversteer and allowed me to power out of the corner.  Here's the corner I'm talking about:


If you want to take a look at my driving, check out this video!  It has a lot of comments to help you guys see what I was thinking and what I was doing to be slower or faster through given sections and corners!  Maybe if you want to get into track racing this will help you!


At the end of the day I ended up meeting a bunch of people and having an amazing time.  Everyone agreed that I was the fastest of the day and I learned so much and had a blast driving with the other novices.  People kept asking if my car was turbocharged and how much displacement I had.  When one driver heard I had an N/A 2.0 liter motor he was shocked!

When I was leaving, some instructors even stopped by and asked who was driving the "red Honda" as everyone called it.  They said, yeah, "you're definitely ready for intermediate group!"

It felt so good finally being fast-- as compared to autocross where all of the lighter cars with better tires destroy me.  I guess we'll see how I do next time!  But for now, I'm gonna sign off.  Hope you had fun reading!

Monday, April 13, 2015

Philly SCCA's Summer Series Rust-Off; Dialing in the DC5

Hey all!  Welcome back to Lexi.Laron!

If this is your first time here, then just "welcome," period!

The other day I took part in an autocross event known as the Summer Series Rust-Off.


Every year, the Philadelphia Region of the Sports Car Club of America hosts its "Rust-Off" so that members can dial their cars in that they've been working on over the winter.  This allows us to prepare for the upcoming points season so that our cars are working to our limits, and not the other way around.


With a long day ahead of us, my friends Anthony and Alex rolled up in their silver and blue miatas, respectively.  Alex just finished building his Miata that he calls #TougeTurbo for track use.

Alex is running some insanely wide Rota Grids with Hankook Ventus RS3 Version 2's for the street and some flow-formed Jongbloed Racing Wheels wrapped in Maxxis RC-1's for auto-x and track use.  Protection for Alex is provided by a full Spec Miata bolt-in cage, six-point RaceQuip Harness, and Sparco Sprint V for extra bolstering.  He is running Tein Sport Coilovers, NA8 brakes and blank rotors, and energy suspension bushings in every possible location.

Those are just some of his upgrades and he is currently in the process of saving up for a turbo kit.  Go check him out on Instagram at @MX5Militia.

(From left to right) Alex's car, my car, and Anthony's car

 The lighting was less than optimal for my phone camera.

Again, poor lighting.

With Alex off to a cruise, it was just Anthony, me, and some friends from the 282 Touge Crew.

We walked the course and started prepping the cars for a day filled with many, many, many runs.  I ended up getting 19 runs in total which is way more than an average Northeast Autocross.  Keep in mind, I started racing in the Midwest where the population density is much lower.

After walking the course and going through tech, I began to dial the car in.  With no sway bar at my last event I was spinning out like crazy.  On exit ramps and other long sweeping corners, my car had more grip than ever with a crappy alignment, however without the sway bar, fast direction changes proved difficult.  Autocross and track are very different-- keep that in mind.  You can see how bad I did at my last event in Hershey in the video below:

Hershey PA Autocross with Susquehanna SCCA

For this event, my stock sway bar was back on with new end links and new tie-rod ends.  I also bled my brake system properly and checked my Hawk HP Plus pad life.  For my next track day I will be replenishing my HP Plus's with new HP Plus's!


With all of that in mind, I'll share with you some of the tuning steps that I went through during my first heat.  My GoPro died for the second heat, so I can't do much for you guys there, except tell you that it went really well!  

The settings for all tire pressures are in cold PSI if stated as an actual number (e.g. tire pressure was 30 PSI).  If the tire pressures are stated in differences (e.g. 1 less PSI in front tires) then I changed the tire pressures while the tires were hot.

The settings for my first run were as follows:
  • Full soft damping rate in front with full stiff in rear
  • Tire pressures:
    • Rear tires-- 29 PSI
    • Front Tires-- 30 PSI
The tire pressures gave me no sidewall scrub in the previous event that I ran in Hershey, PA.

After the first run, I noticed that the car was rather unpredictable in direction changes.  I was getting a lot of snap oversteer when transitioning from the first slalom to the next.  As a result, I decided to stiffen up my damping rate in the front by five clicks.  Keep in mind the Tein Street Flex has 24 "clicks" of adjustability.

Run 2 went much better.  The oversteer I received in transitions was much more predictable.  The settings for this run were as follows:
  • Five clicks from full soft in front for damping rates
  • Tire pressures same
For Run 3 I went with the same settings as for Run 2, but I noticed that on the long sweeper in the back I was getting substantial understeer.  As a result I decided to lower my front tire pressures by one PSI for Run 4.

Run 4:
  • 1 PSI less in front tires
  • Same damping settings
If you're an experienced auto crosser, you know that sidewall scrub is bad.  This occurs when the tire rolls onto its outer edge during cornering.  This is bad because you lose contact patch.

Notice how the front passenger side tire is almost on its edge as this Audi corners

To determine if you are scrubbing, there is a technique that most autocrossers use known as "chalking the tires."  What you have to do is take a piece of chalk and color the side of the tire with the arrow shown below:


If you are just on the arrow, you know you are using the tire to its full potential and your tire pressures are set correctly.  However, if you are riding on this arrow, you are losing grip due to sidewall scrub in most cases.  Of course, there are other variables, but this is an all-else-equal approach to sidewall scrub, contact patch, and maintaining grip.

During Run 4, I noticed that I was not using all of my rear tires thanks to this tire chalking technique.  So, I let out one PSI in the rear tires for my fifth run.

Run 5:
  • Same damping rates
  • 1 less PSI in rear tires
Run 6, 7, and 8 all utilized the same settings as Run 5.  During these runs I was trying to push my car as hard as possible.  I got a feel for the cars limits and by Run 9 I was able to more gently modulate my throttle during the slaloms, transitions, and sweepers.  

Look at it in the video to verify my improvement.

The last run of the first heat was Run 10.  During Run 9 I noticed that I was still getting a lot of understeer on the "turnaround" in the middle of the course.  I know now that I need more front camber because I am currently running with no alignment.  

Also I am losing grip when my front end is compressing.  This implies that I am losing contact patch in the front of my car upon compression thanks to the wonders of macpherson strut suspension geometry.  

Take a look for yourself and READ the caption!

Taken from Sport Compact Car

So, even though letting out more air in the front would result in more sidewall scrub (I was already on top of the arrow) I decided to let out more air pressure up front for my final run.  It helped me to corner at the turnaround, but again, I was losing contact patch due to sidewall scrub.

Run 10:
  • One less PSI in front
  • Same suspension settings
Here's a video of all of the runs from my first heat:


During the second heat I marked my fastest time of 29.288 seconds on the course with no cones.  I beat a couple of really good cars (mainly AWD and RWD) with good drivers and good tires (most had Direzza ZII Star Specs).

Fastest Run:
  • Suspension five clicks from soft in front, full stiff in rear
  • Front tire pressure: 34 PSI
  • Rear tire pressure: 28 PSI
Keep in mind that these tires are better than the Bridgestone Potenza S-04 Pole Positions that I am running.  Once I get my camber dialed in to be negative in the front, slightly negative in the rear, and my toe to be at zero degrees all around, I believe I will be poised to be much faster in future runs!

Thanks for reading guys!

Saturday, December 27, 2014

DIY A/C Delete on 2006 Acura RSX Type-S

Hey readers!

How are you all?  It has been a while yet again.  And while that is a common theme in almost every post-- that I am a slacker-- I still come back to write over and over again because it's something I love to do in my spare time.

Currently I am on break from school.  I am in my senior year as an engineering student and while I cannot wait to graduate and make money at a job for cawr pawrts, I have also been having the time of my life!

So much has changed...some for the better and some for the worst.  But I have grown a lot as a result.
_________________________________________________

Anyway, enough of the sappy stuff.  Let's get down to the nitty gritty!

Since I do not have a job I am pretty low on money.  This is not a big deal, but it has cut into my plans for next season pretty seriously.  My goals were to get hasport motor mounts, swift springs, and a racing seat for the car with other possibilities including a high flow cat to get me back into STX class, vents for my hood, and possibly a steering wheel.

Momo Start Bucket Seat (FIA Approved), Personal Neo Grinta 330 mm, Swift Springs, HASport Motor Mounts

Long story short I've been going nuts not being able to modify this thing!  All I can do is practice driving on driving simulators and that's just not the real thing.

My Brother Playing GT6 with my Logitech Force Feedback Wheel on my Parents' 50" Flat Screen

I had been thinking recently about ways to save weight.  One thing I did was I deleted my rear windshield wiper, but I'm sure that only netted me four pounds at most.  I wanted something more.  I was fiending.

So, I decided to delete my A/C.  After all, I never used it and I was pretty sure that it needed a recharge anyway.  So instead of giving it some more refrigerant I just removed it all together.  Recharge for what?

Other reasons for removing A/C include:
  • Decreasing the rolling drag on the serpentine belt that runs off of the crank, thus slightly improving power and mpg
  • Removal of the A/C condenser which sits directly in front of the radiator therefore making more space for an intercooler if I ever wanted to boost the car
  • Increased air flow to the radiator therefore reducing the chances of overheating on track
With all of that being said, the only thing I'd really be giving up is comfort and possibly it may make my tune function differently.  So, let's begin!


You're going to want to start by removing the power steering reservoir with a 10 mm ratchet.  This will allow you access to the 12 mm (?) bolt that sits on the idler pulley.  Put a long serpentine belt with a socket over this idler pulley's bolt and pull it toward you to break the tension in the belt.  Then, remove the belt off of the top pulley (the power steering pump's pulley).


Look closely at the bottom-right of this picture.  A hard line for the A/C sits here and connects to the condenser.  A second line like this is on the left side of the condenser.  After safely (and legally) removing the refrigerant from your system, pop the bolts off of these hard lines and pull them away from the condenser.


Next, unbolt the power steering coil which sits in front of the condenser.  This coil probably serves as a mini-me heat exchanger to prevent the power steering fluid from overheating.  Notice there's not much more to the cooling duties of the P/S fluid than this.


On the right and left of the condenser, you will find these brackets that hold it to the radiator support.  Unbolt the condenser on both sides with some sort of wrench that gives you easy access behind the headlights.  I used this swivel thing with a 10 mm socket.


The picture above shows the condenser removed.. Looks pretty beat up.  You can tell that the bottom part is where the bumper opens up to allow air to flow through because there's all sorts of crap in there.

If you take a look at the next picture you'll get an idea for how much space this frees up.  For all of you guys who track, you know that when your car has overheating problems that providing more airflow (either through venting or through ducting or whatever) is one solution.  I don't think the DC5 has cooling problems, but a little added reassurance is never a bad thing.

Plus I like to rationalize over negligible changes on my car because I'm a nerd :)


The next thing I did was remove the radiator mounting brackets and the radiator cap.  To remove the compressor, it is easier to remove everything sitting in front of the engine.  It's all due to a single bolt which sits right above the subframe.  Talk about a pain.


The coolant was changed when I first bought the car...about three years ago.  I was worried that it'd come out looking like crap since I have had a bunch of auto-x days and parade laps at Pocono on this motor.  However the fluid didn't even look that bad!  It was clear and not viscous.


To be absolutely sure that I wasn't killing my engine all of this time, I took out a coolant test tool to look at the boil-over and freeze protection of this fluid.  

The following picture shows the boil-over protection of the fluid.  The recommended boiling point of the fluid is 129 degrees Celsius according to this little gauge.  Mine was slightly compromised at 128 degrees Celsius, but I feel that maybe if the fluid filled up the little gauge more, the needle inside would have risen more.  Not too shabby!


Next I checked the freeze protection of the coolant.  The picture below shows a recommended -37 degrees Celsius freezing point and an actual freezing point of -29 degrees Celsius.  Again, more fluid in the little plastic part may have helped, but this is okay for me...good thing I will be flushing the coolant and replacing later anyway.


Next there are four painful connectors connected to a painful harness which is fastened in a painful manner to the radiator fan and to the bulkhead.  Remove those.


You'll notice in this last picture that I had already removed the clamp from the lower radiator hose.  I also removed the lower radiator hose before taking these clips out.  Big mistake.  My hair smelled like coolant all night.


Remove your upper radiator hose, and your radiator is essentially free!  You may want to not only remove the passenger side headlight to remove the radiator, however.  You may want to remove the driver's side as well.  This will give your ratchet access to the crash bar's bolts that hold it to the frame rails.


With the radiator removed your front end will look much like this.  Remember, I really do recommend you remove this crash bar AND your headlights BEFORE taking the radiator out.  This was my first time doing this and the order in which I did things was a little wacky.


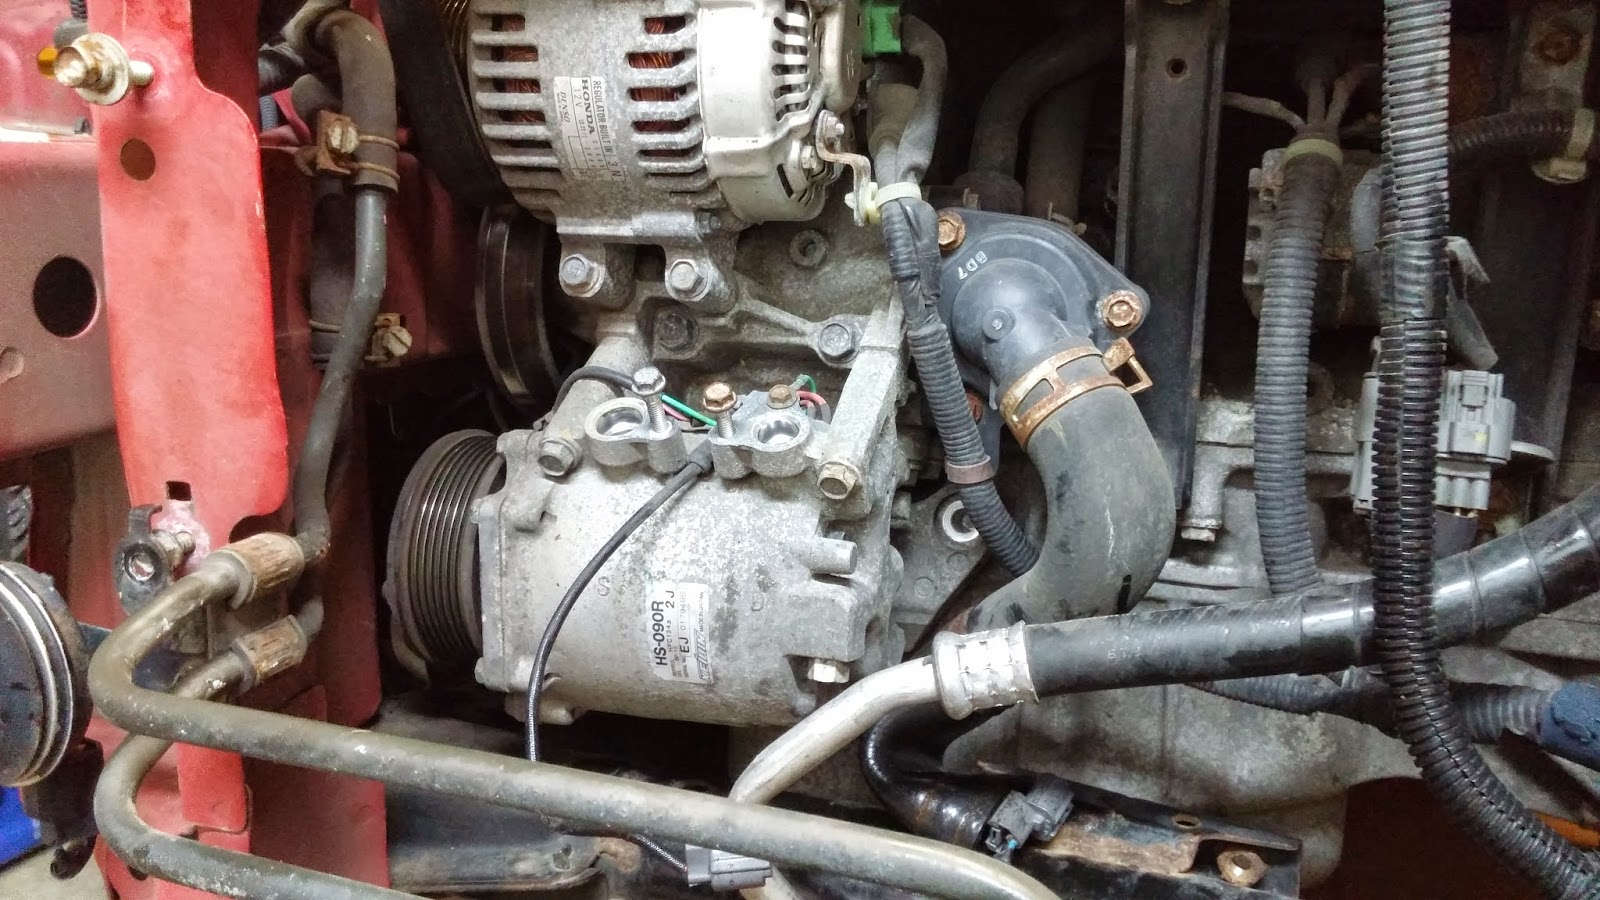
After removing the crash bar you'll have a ton of access to that A/C compressor at the bottom-left hand side of the picture.


There is an inlet to the compressor and an outlet.  I'm not sure if the fluid entering the compressor is gaseous or if it's liquid.  I'm not too keen on the specifics of A/C operation, but I know the outlet is "compressed" A.K.A. at a higher pressure than the inlet.  This compressed fluid is then cooled in the condenser.


Next I removed the bolts holding the compressor to the bracket.


Try to compare this picture to the first close-up of the compressor.  You'll notice two of the bolts holding the compressor to the block are removed.  Remove these!


There is one last annoying bolt which is sitting RIGHT ABOVE THE SUBFRAME on this car.  This is the whole reason why you are disassembling your whole car.  Thanks Honda.


When you take your compressor off of the motor, you'll see a bracket that was holding the bottom of the compressor to the block.  In this picture it is removed, but you will want to remove that bracket as well since it serves no purpose now.


There's some sort of sensor that goes into the evaporator.  I'm guessing it's a temperature sensing element.  Remove the clip that goes to this sensor first.


Now, unbolt the whole canister from the car along with the bracket that's holding it.  Most pieces of this system are very light aside from the compressor.  You'll notice that this canister is especially light despite the way it looks (heavy and ugly).


Now, start unbolting your hard lines from the rest of the A/C system.


This hard line goes up and over the engine.  Remove the whole bracket from the radiator support.


With the top line removed, you will be able to focus your efforts on getting your NEW SERPENTINE BELT IN!  YAY!

The belt pictured below is a smaller belt than the stock belt.  I went this route versus buying idler pulleys to delete the A/C and power steering because:
  • I want to keep my power steering-- it makes it easier for me to control the car while cornering
  • Adding an idler pulley reduces drag caused by the compressor, but it still has more drag versus a smaller belt with less pulleys
  • The lower amount of ribs in the belt will also serve to decrease drag slightly and I am positively certain it will hold up.
    • Spaz of ClubRSX uses a smaller ribbed belt on his K24 motor with an Accord pulley and it is fine.
If you'd like to purchase the belt you can get it online for pretty cheap.  I paid around $20 for mine with shipping and handling.  The part number is: 537K6


To loop the belt around, you will follow the following configuration shown in the diagram stolen from ClubRSX:


This picture shows how the belt physicall wraps first around the alternator and then up and over the water pump.


One of the last things I did was plug up the A/C hard lines in case I wanted to ever have A/C in this car again.  I will probably be removing these lines soon, but I did not feel like it, so I just left them there.


Finally, your last step is to re-install the radiator and everything else.  Flush your coolant, fill the system with new coolant, burp the system, and take your whip for a drive!  Forgive the sideways picture!


I hope you all enjoyed this read.  It was fun for me to get back out there and work on my car for a small price of $20.  I will be letting you guys know about how the car feels after I finish doing the coolant!

Peace and thanks for reading!