
Hey readers!
How are you all? It has been a while yet again. And while that is a common theme in almost every post-- that I am a slacker-- I still come back to write over and over again because it's something I love to do in my spare time.
Currently I am on break from school. I am in my senior year as an engineering student and while I cannot wait to graduate and make money at a job for cawr pawrts, I have also been having the time of my life!
So much has changed...some for the better and some for the worst. But I have grown a lot as a result.
Anyway, enough of the sappy stuff. Let's get down to the nitty gritty!
Since I do not have a job I am pretty low on money. This is not a big deal, but it has cut into my plans for next season pretty seriously. My goals were to get hasport motor mounts, swift springs, and a racing seat for the car with other possibilities including a high flow cat to get me back into STX class, vents for my hood, and possibly a steering wheel.

Long story short I've been going nuts not being able to modify this thing! All I can do is practice driving on driving simulators and that's just not the real thing.

I had been thinking recently about ways to save weight. One thing I did was I deleted my rear windshield wiper, but I'm sure that only netted me four pounds at most. I wanted something more. I was fiending.
So, I decided to delete my A/C. After all, I never used it and I was pretty sure that it needed a recharge anyway. So instead of giving it some more refrigerant I just removed it all together. Recharge for what?
Other reasons for removing A/C include:


You'll notice in this last picture that I had already removed the clamp from the lower radiator hose. I also removed the lower radiator hose before taking these clips out. Big mistake. My hair smelled like coolant all night.


After removing the crash bar you'll have a ton of access to that A/C compressor at the bottom-left hand side of the picture.

There is an inlet to the compressor and an outlet. I'm not sure if the fluid entering the compressor is gaseous or if it's liquid. I'm not too keen on the specifics of A/C operation, but I know the outlet is "compressed" A.K.A. at a higher pressure than the inlet. This compressed fluid is then cooled in the condenser.
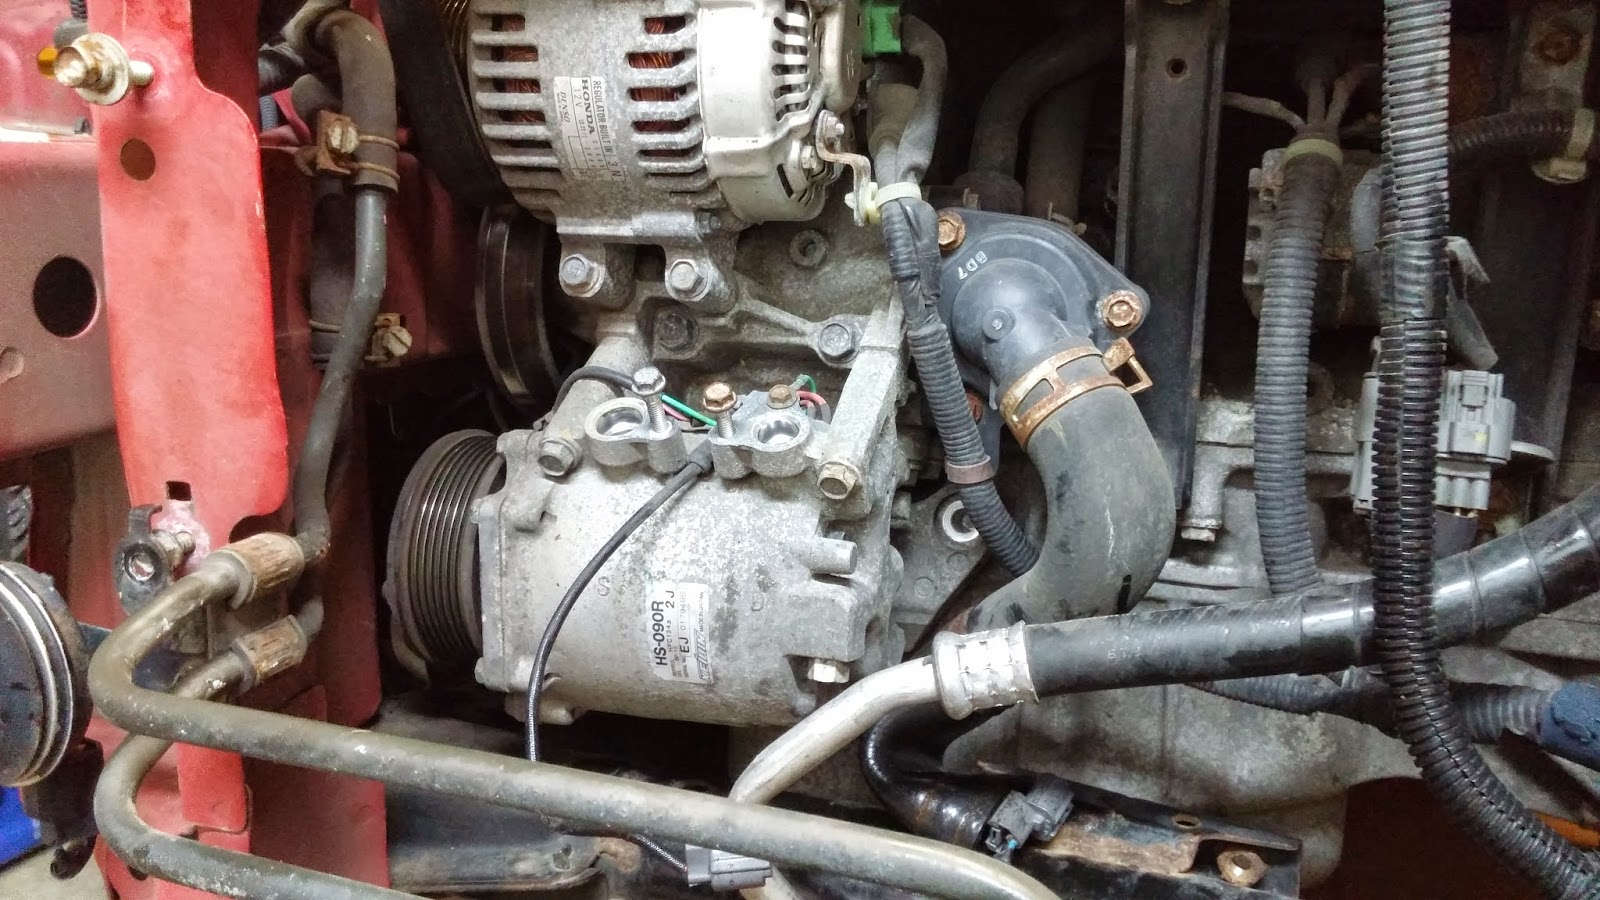
Next I removed the bolts holding the compressor to the bracket.


There's some sort of sensor that goes into the evaporator. I'm guessing it's a temperature sensing element. Remove the clip that goes to this sensor first.

Now, unbolt the whole canister from the car along with the bracket that's holding it. Most pieces of this system are very light aside from the compressor. You'll notice that this canister is especially light despite the way it looks (heavy and ugly).

Now, start unbolting your hard lines from the rest of the A/C system.

This hard line goes up and over the engine. Remove the whole bracket from the radiator support.

With the top line removed, you will be able to focus your efforts on getting your NEW SERPENTINE BELT IN! YAY!
The belt pictured below is a smaller belt than the stock belt. I went this route versus buying idler pulleys to delete the A/C and power steering because:

To loop the belt around, you will follow the following configuration shown in the diagram stolen from ClubRSX:

This picture shows how the belt physicall wraps first around the alternator and then up and over the water pump.

One of the last things I did was plug up the A/C hard lines in case I wanted to ever have A/C in this car again. I will probably be removing these lines soon, but I did not feel like it, so I just left them there.


Finally, your last step is to re-install the radiator and everything else. Flush your coolant, fill the system with new coolant, burp the system, and take your whip for a drive! Forgive the sideways picture!

I hope you all enjoyed this read. It was fun for me to get back out there and work on my car for a small price of $20. I will be letting you guys know about how the car feels after I finish doing the coolant!
Peace and thanks for reading!
How are you all? It has been a while yet again. And while that is a common theme in almost every post-- that I am a slacker-- I still come back to write over and over again because it's something I love to do in my spare time.
Currently I am on break from school. I am in my senior year as an engineering student and while I cannot wait to graduate and make money at a job for cawr pawrts, I have also been having the time of my life!
So much has changed...some for the better and some for the worst. But I have grown a lot as a result.
_________________________________________________
Anyway, enough of the sappy stuff. Let's get down to the nitty gritty!
Since I do not have a job I am pretty low on money. This is not a big deal, but it has cut into my plans for next season pretty seriously. My goals were to get hasport motor mounts, swift springs, and a racing seat for the car with other possibilities including a high flow cat to get me back into STX class, vents for my hood, and possibly a steering wheel.
Momo Start Bucket Seat (FIA Approved), Personal Neo Grinta 330 mm, Swift Springs, HASport Motor Mounts
Long story short I've been going nuts not being able to modify this thing! All I can do is practice driving on driving simulators and that's just not the real thing.
My Brother Playing GT6 with my Logitech Force Feedback Wheel on my Parents' 50" Flat Screen
I had been thinking recently about ways to save weight. One thing I did was I deleted my rear windshield wiper, but I'm sure that only netted me four pounds at most. I wanted something more. I was fiending.
So, I decided to delete my A/C. After all, I never used it and I was pretty sure that it needed a recharge anyway. So instead of giving it some more refrigerant I just removed it all together. Recharge for what?
Other reasons for removing A/C include:
- Decreasing the rolling drag on the serpentine belt that runs off of the crank, thus slightly improving power and mpg
- Removal of the A/C condenser which sits directly in front of the radiator therefore making more space for an intercooler if I ever wanted to boost the car
- Increased air flow to the radiator therefore reducing the chances of overheating on track
With all of that being said, the only thing I'd really be giving up is comfort and possibly it may make my tune function differently. So, let's begin!
You're going to want to start by removing the power steering reservoir with a 10 mm ratchet. This will allow you access to the 12 mm (?) bolt that sits on the idler pulley. Put a long serpentine belt with a socket over this idler pulley's bolt and pull it toward you to break the tension in the belt. Then, remove the belt off of the top pulley (the power steering pump's pulley).
Look closely at the bottom-right of this picture. A hard line for the A/C sits here and connects to the condenser. A second line like this is on the left side of the condenser. After safely (and legally) removing the refrigerant from your system, pop the bolts off of these hard lines and pull them away from the condenser.
Next, unbolt the power steering coil which sits in front of the condenser. This coil probably serves as a mini-me heat exchanger to prevent the power steering fluid from overheating. Notice there's not much more to the cooling duties of the P/S fluid than this.
On the right and left of the condenser, you will find these brackets that hold it to the radiator support. Unbolt the condenser on both sides with some sort of wrench that gives you easy access behind the headlights. I used this swivel thing with a 10 mm socket.
The picture above shows the condenser removed.. Looks pretty beat up. You can tell that the bottom part is where the bumper opens up to allow air to flow through because there's all sorts of crap in there.
If you take a look at the next picture you'll get an idea for how much space this frees up. For all of you guys who track, you know that when your car has overheating problems that providing more airflow (either through venting or through ducting or whatever) is one solution. I don't think the DC5 has cooling problems, but a little added reassurance is never a bad thing.
Plus I like to rationalize over negligible changes on my car because I'm a nerd :)
The next thing I did was remove the radiator mounting brackets and the radiator cap. To remove the compressor, it is easier to remove everything sitting in front of the engine. It's all due to a single bolt which sits right above the subframe. Talk about a pain.
The coolant was changed when I first bought the car...about three years ago. I was worried that it'd come out looking like crap since I have had a bunch of auto-x days and parade laps at Pocono on this motor. However the fluid didn't even look that bad! It was clear and not viscous.
To be absolutely sure that I wasn't killing my engine all of this time, I took out a coolant test tool to look at the boil-over and freeze protection of this fluid.
The following picture shows the boil-over protection of the fluid. The recommended boiling point of the fluid is 129 degrees Celsius according to this little gauge. Mine was slightly compromised at 128 degrees Celsius, but I feel that maybe if the fluid filled up the little gauge more, the needle inside would have risen more. Not too shabby!
Next I checked the freeze protection of the coolant. The picture below shows a recommended -37 degrees Celsius freezing point and an actual freezing point of -29 degrees Celsius. Again, more fluid in the little plastic part may have helped, but this is okay for me...good thing I will be flushing the coolant and replacing later anyway.
Next there are four painful connectors connected to a painful harness which is fastened in a painful manner to the radiator fan and to the bulkhead. Remove those.
You'll notice in this last picture that I had already removed the clamp from the lower radiator hose. I also removed the lower radiator hose before taking these clips out. Big mistake. My hair smelled like coolant all night.
Remove your upper radiator hose, and your radiator is essentially free! You may want to not only remove the passenger side headlight to remove the radiator, however. You may want to remove the driver's side as well. This will give your ratchet access to the crash bar's bolts that hold it to the frame rails.
With the radiator removed your front end will look much like this. Remember, I really do recommend you remove this crash bar AND your headlights BEFORE taking the radiator out. This was my first time doing this and the order in which I did things was a little wacky.
After removing the crash bar you'll have a ton of access to that A/C compressor at the bottom-left hand side of the picture.
There is an inlet to the compressor and an outlet. I'm not sure if the fluid entering the compressor is gaseous or if it's liquid. I'm not too keen on the specifics of A/C operation, but I know the outlet is "compressed" A.K.A. at a higher pressure than the inlet. This compressed fluid is then cooled in the condenser.
Next I removed the bolts holding the compressor to the bracket.
Try to compare this picture to the first close-up of the compressor. You'll notice two of the bolts holding the compressor to the block are removed. Remove these!
There is one last annoying bolt which is sitting RIGHT ABOVE THE SUBFRAME on this car. This is the whole reason why you are disassembling your whole car. Thanks Honda.
When you take your compressor off of the motor, you'll see a bracket that was holding the bottom of the compressor to the block. In this picture it is removed, but you will want to remove that bracket as well since it serves no purpose now.
Now, unbolt the whole canister from the car along with the bracket that's holding it. Most pieces of this system are very light aside from the compressor. You'll notice that this canister is especially light despite the way it looks (heavy and ugly).
Now, start unbolting your hard lines from the rest of the A/C system.
This hard line goes up and over the engine. Remove the whole bracket from the radiator support.
With the top line removed, you will be able to focus your efforts on getting your NEW SERPENTINE BELT IN! YAY!
The belt pictured below is a smaller belt than the stock belt. I went this route versus buying idler pulleys to delete the A/C and power steering because:
- I want to keep my power steering-- it makes it easier for me to control the car while cornering
- Adding an idler pulley reduces drag caused by the compressor, but it still has more drag versus a smaller belt with less pulleys
- The lower amount of ribs in the belt will also serve to decrease drag slightly and I am positively certain it will hold up.
- Spaz of ClubRSX uses a smaller ribbed belt on his K24 motor with an Accord pulley and it is fine.
To loop the belt around, you will follow the following configuration shown in the diagram stolen from ClubRSX:
This picture shows how the belt physicall wraps first around the alternator and then up and over the water pump.
One of the last things I did was plug up the A/C hard lines in case I wanted to ever have A/C in this car again. I will probably be removing these lines soon, but I did not feel like it, so I just left them there.
Finally, your last step is to re-install the radiator and everything else. Flush your coolant, fill the system with new coolant, burp the system, and take your whip for a drive! Forgive the sideways picture!
I hope you all enjoyed this read. It was fun for me to get back out there and work on my car for a small price of $20. I will be letting you guys know about how the car feels after I finish doing the coolant!
Peace and thanks for reading!


